FLOAT RP23 REAR SHOCK
Installing Your Shock | General Maintenance | Before You Ride | Measuring Sag | Setting Sag | Adjusting Rebound | ProPedal | Service Intervals | Important Safety Information | Stuck Down Shock | Air Sleeve Maintenance
|
|
weight |
0.47 lbs./213 g |
|
features/adjustments |
high volume standard air sleeve, lightweight chassis, DOHC ProPedal Technology that provides pedaling efficiency as well as control and sensitivity for big and small hits. with 2 positions, ProPedal adjust with 3 FIRM positions, air spring pressure, rebound adjust | |
|
spring |
air | |
|
intended use |
freeride A style of riding that is defined by short course technical acrobatics and athletes that defy gravity. Generally, the bikes and components required for freeriding are stronger and heavier than their lightweight cross-country brethren. Combine the aerial pyrotechnics of freeriding with some longer trails and courses, as is typical of cross-country riding, and now you're looking at all-mountain riding., all-mountain A style of bicycle riding that melds the stamina and conditioning required of cross-country with the technical abilities of freeriding., cross-country A style of bicycle riding that is defined by long rides, lightweight bicycles and stamina. |
If you are installing your shock on a bike in which the shock is not original equipment:
Install the shock.
Remove the main air chamber air cap and let all the air out of the main air chamber.
Carefully cycle the suspension through its entire travel.
Check that all parts of the shock are clear of the frame and swingarm as it cycles through the travel.
Pressurize your main air chamber to a minimum of 50 psi and no more than 300 psi. You will tune to a more specific air pressure in the Setting Sag section below.
There may be a small amount of air sleeve lubricant residue on the body. This is normal. If this residual air sleeve lubricant is not present, this is an indication that the air sleeve should be re-lubricated. Some other things to consider for all shock models:
If you ride in extreme conditions, service your shock and air sleeve more frequently. Check the maintenance schedule for your shock.
Wash your shock with soap and water only.
Do not use a high pressure washer to clean your shock.
Internal service should be performed by FOX Racing Shox or an Authorized Service Center.
Clean the outside of your shock with soap and water and wipe dry with a soft dry rag. Do not use a high pressure washer on your shock.
Inspect entire exterior of shock for damage. The shock should not be used if any of the exterior parts appear to be damaged. Please contact your local dealer or FOX Racing Shox for further inspection and repair.
Check that quick-release levers (or thru-axle pinch bolts) are properly adjusted and tightened.
Check headset adjustment. If loose, adjust according to manufacturer’s recommendations.
Check that brake cables or hoses are properly fastened.
Check that the front and rear brakes operate properly on flat land.
You can also view a Flash video on Setting Sag.
To set sag:
Measure sag, and compare it to the recommended sag setting shown in the Air Spring Setting Guidelines table below. Continue if the sag is not to specification.
Locate the Schrader air valve on the shock and remove the air valve cap.
Screw the FOX Racing Shox High Pressure Pump onto the air valve until the pump shows pressure on the gauge. Do not over-tighten.
Add air pressure until desired pressure is shown on the gauge. Refer to the Air Spring Setting Guidelines table below for the proper sag setting.
Unthread the pump from the air valve and measure sag.
Repeat steps 2-5 until proper sag is achieved, then replace the air valve cap.
|
Shock Travel |
Sag |
|
1.00/25.4 |
.25/6.4 |
|
1.25/31.7 |
.31/7.9 |
|
1.50/38.1 |
.38/9.5 |
|
1.75/44.4 |
.44/11.1 |
|
2.00/50.8 |
.50/12.7 |
|
2.25/57.1 |
.56/14.2 |
Rebound controls the rate at which your shock returns after it has been compressed. The proper rebound setting is a personal preference, and changes with rider weight, riding style and conditions. A rule of thumb is that rebound should be as fast as possible without kicking back and pushing the rider off the saddle.
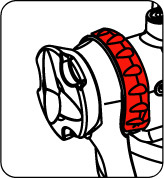
The rebound knob has 8-10 clicks of adjustment.
For slower rebound, turn the red adjuster knob clockwise.
For faster rebound, turn the red adjuster knob counterclockwise.

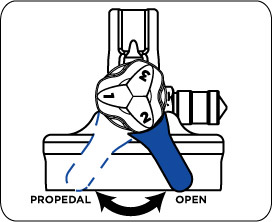
The ProPedal lever allows for on-the-fly ProPedal adjustment. ProPedal damping reduces pedal-induced suspension bob. The two ProPedal lever settings are:
OPEN
PROPEDAL
Use each setting to adjust the shock for different riding conditions and situations. For example, use PROPEDAL for riding to the top of the mountain, and then switch to OPEN for the descent.

To determine which ProPedal position is better for your condition and situation, pedal the bicycle and monitor the shock movement. Switch between positions and select the one that reduces suspension movement most effectively while providing the desired amount of bump absorption.
Because suspension designs and riding skills vary, optimal settings can vary from bike to bike and rider to rider. For more precise ProPedal tuning and to further eliminate pedal-induced bob while maintaining bump compliance, adjust the ProPedal knob. As with the ProPedal lever, switch positions and select a setting that reduces suspension movement most effectively while providing the desired amount of bump absorption.
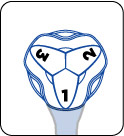
The 3-position ProPedal knob (shown below) allows you to adjust ProPedal firmness when the ProPedal lever is in the PROPEDAL position. The ProPedal knob only changes damping when the ProPedal lever is in the PROPEDAL position.
The ProPedal knob settings are denoted by the numbers etched onto the ProPedal knob. The three ProPedal knob settings are:
(1) PROPEDAL Light
(2) PROPEDAL Medium
(3) PROPEDAL Firm

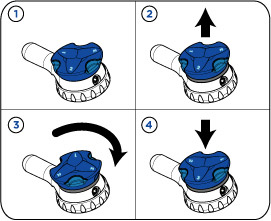
To adjust the ProPedal knob:
Turn the ProPedal lever to the PROPEDAL position, as shown in graphic above.
Lift the ProPedal knob (see frame #2 in the drawing below).
Turn the ProPedal knob clockwise (relative to the ProPedal knob facing the user) until the selection you want—1, 2, or 3—is aligned with the ProPedal lever (#3). The ProPedal knob clicks twice per setting as it turns. The first click occurs as you exit the current setting; the second click as you engage the new setting.
Push the ProPedal knob into its new position (#4).
The ProPedal knob should NOT be adjusted on-the-fly. It should only be adjusted while in a stationary position.

eng056