|
|
|
|
Installing Your Fork | Before You Ride | Setting Sag | Adjusting Rebound | Locking Out the Fork | Adjusting Lockout Force | Adjusting Low-Speed Compression | Changing Travel | Service Intervals | Important Safety Information
|
|
travel |
5 in. / 130 mm TALAS 130+110+90 mm |
|
features/adjustments |
TALAS travel system, low-speed compression, lockout, lockout force adjust, air spring pressure, rebound |
|
|
spring/damper type |
air/open bath |
|
|
intended use |
all-mountain, cross-country |
Be sure your fork is properly installed before proceeding. Clicking on the link above will take you to a new page. If your fork came pre-installed on your bicycle, continue with Adjusting Rebound.
To get the best performance from your fork, it is necessary to set and adjust sag. Generally, sag should be set to 15 – 25% of total fork travel.
Note: Hold the TALAS lever steady with one hand while unscrewing the aircap with the other. This will facilitate removal of the aircap and also protect the TALAS lever from being forced past its stops.

Rider Weight | Air Pressure |
< 125 lbs. | 50 psi |
125 - 135 lbs. | 55 psi |
135 - 145 lbs. | 60 psi |
145 - 155 lbs. | 65 psi |
155 - 170 lbs. | 70 psi |
170 - 185 lbs. | 80 psi |
185 - 200 lbs. | 90 psi |
200 - 215 lbs. | 100 psi |
215 - 230 lbs | 115 psi |
230 - 250 lbs. | 125 psi |
Travel | XC/Race FIRM | All-Mountain PLUSH |
90 mm (3.5") | 13 mm (1/2") | 18 mm (3/4") |
110 mm (4.25") | 16 mm (3/5") | 22 mm 7/8") |
130 mm (5") | 19 mm (3/4") | 26 mm (1") |
Note: Sag and spring rate will self adjust to the proper setting and rate as TALAS is adjusted to shorter travel positions.
Symptom | Remedy |
Too much sag | (+) air pressure in 5 psi increments |
Too little sag | (-) air pressure in 5 psi increments |
Excessive bottoming | (+) air pressure in 5 psi increments |
Harsh ride; full travel not utilized | (-) air pressure in 5 psi increments |
The rebound knob (shown below) is located on the top of the right fork leg, and has 12 clicks of adjustment. Rebound controls the speed at which the fork extends after compressing. Turning the knob clockwise slows down rebound; turning the knob counterclockwise speeds up rebound. As a starting point, turn the rebound adjuster knob all the way clockwise (full in) until it stops, then turn counterclockwise (out) 6 clicks.

|
Knob Setting |
Setting Description |
Tuning Tips |
Setup Tips |
|
|
Slow Rebound |
Too slow and your fork will pack down and ride harsh. |
If you increase your spring rate or air pressure, you will need to slow down your rebound. |
|
6 (Factory setting) |
Average Rebound |
||
|
|
Fast Rebound |
Too fast and you will experience poor traction and wheel hop. |
If you decrease your spring rate or air pressure, you will need to speed up your rebound setting. |
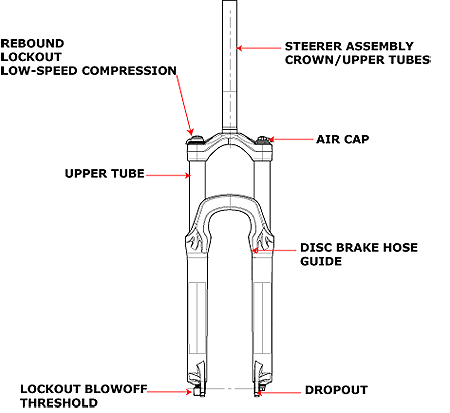
The blue compression lockout lever is located below the red rebound adjuster knob. It allows the rider to close the compression damping circuit in the fork. This keeps the fork at the top of its travel, making it harder to compress.
Rotate the lever fully clockwise to lockout the fork. This position is useful in climbing and sprinting situations, but will sag with the rider’s weight. The fork will "blowoff" in the event that a big hit is encountered with the fork locked out.
To unlock the fork, simply rotate the lever fully counterclockwise.
Note: The fork may cycle a couple of times after enabling lockout. Once complete lockout is achieved, the fork may continue to move 3 - 5 mm. This is normal and does not affect performance.
Even when your RP24 TALAS fork is fully locked out, there are instances when you still want your fork to be active. To protect your fork's internal parts, your FOX fork will "blowoff" when it encounters an intense hit. You can adjust when the fork blows off—lockout force—by adjusting the blue knob on the bottom of the right leg.
A convenient tuning feature of the lockout force knob is that it allows you to leave your fork in the locked out position—no more fiddling with fork controls when the trail requires your undivided attention. Although you might need to adjust the knob a few times to find the sweet spot, once it is found you can simply leave your fork locked out. Your fork will then respond to hits in the trail (greater lockout force), for example, but will be locked out (lower lockout force) when you are out of your saddle on a climb.
Turn the knob clockwise to increase lockout force and counterclockwise to decrease lockout force.
There are 4 clicks of adjustment. As a starting point, turn the knob all the way clockwise until it stops, then back off one click counterclockwise.
Low-speed compression damping is adjusted with the blue bezel ring (shown below) below the blue lockout lever, and has 8 clicks of adjustment. Compression damping controls the speed at which the fork compresses. Adjust low-speed compression with lockout disabled (lockout lever fully counterclockwise). As a starting point, turn the low-speed compression dial all the way counterclockwise (full out) until it stops, then turn clockwise (in) 5 clicks.

|
Knob Setting |
Setting Description |
Tuning Tips |
Setup Tips |
|
|
Soft Compression |
Too soft and your fork will pack down and ride harsh. |
Maximum wheel traction and bump compliance. Too soft and you maybe have excessive brake dive and wallowy feel. |
|
5 |
Average Compression |
||
|
|
Firm Compression |
Too firm and you will experience poor traction and wheel hop. |
Resists brake dive and keeps the fork up in the travel. Too firm and you may have poor traction in loose conditions. |
The RP24 TALAS fork features three externally adjustable travel choices from 5.5" (140 mm) to 4.72" (120 mm) to 3.93" (100 mm), which are easily selected with the TALAS lever located on top of the left fork leg. Travel options and direction settings are printed directly on the lever.
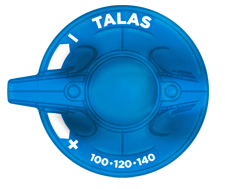
Note: When changing travel, the TALAS system automatically adjusts to provide you with the appropriate linear air spring rate for each travel setting. There is no need to re-adjust the air pressure in the TALAS air chamber after changing travel.
For safety reasons, it is recommended that travel adjustment be done while off the bike. If necessary, travel can be adjusted on-the-fly (being careful when using this "extreme" travel adjusting method), which can be handy right before a grueling climb or steep descent.
From the 140 or 120 mm position, turn the lever counterclockwise to decrease travel. Travel will be decreased in 20 mm increments. Do not force the lever past the 100 mm position.
From the 100 or 120 mm position, turn the lever clockwise to increase travel. Travel will be increased in 20 mm increments. Do not force the lever past the 140 mm position.
![]()
Bushing Technology & Inspection | | Oil Volumes | Dropout Thickness Inspection | Using the FOX HP Pump | Important Safety Information | Service Intervals | Contact FOX Service | FOXHelp Service Web Site