2017-2020 Transfer Seatpost Owner's Guide
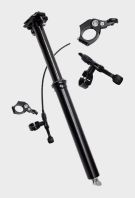
Features/Adjustments
- Available diameters: 30.9mm or 31.6mm
- Available seatpost drops: 4in/100mm, 5in/125mm, 6in/150mm, 7in/175mm
- Two remote options (1X-Under/Left or 2X/3X-Left/Right)
- Internal or Collar cable routing available
- Two bolt, no slip saddle clamp
- Infinite height adjust
Riding style
XC, Trail, AM, Freeride
For instructions to help you decide which length Transfer Seatpost will best fit your application, please click: Determine Which Transfer Seatpost Will Fit Your Bike »
You can download a .pdf of the printed Transfer Seatpost Owner's Guide translated into 7 languages by clicking: Manual: FOX Transfer 2017, Infinite Adjust Seat Post Owners Guide »
WARNING: FOX products should be installed by a qualified bicycle service technician, in accordance with FOX installation specifications. If you have any doubts as to whether or not you can properly install the Transfer adjustable height seatpost on your bicycle, defer to a professionally trained bicycle service technician. Improperly installed products can fail, causing the rider to lose control, potentially causing SERIOUS INJURY OR DEATH.
WARNING: Regardless of bicycle frame tube configuration, the best structural support is achieved when the Transfer seatpost is inserted at least to 1) the minimum insertion mark on the seatpost, AND 2) the minimum insertion point specified by the manufacturer of your bicycle frame. Neglecting these two items risks causing damage to the frame and seatpost, potentially causing SERIOUS INJURY OR DEATH.
WARNING: Make sure that the Transfer remote lever does not interfere with normal brake and shift lever operation. Failure to do so can result in loss of control, potentially causing SERIOUS INJURY OR DEATH.
WARNING: Make sure that the bottom cap of the Transfer seatpost never touches any part of the frame, or the rear shock through the entire range of shock travel. Make sure that no part of the internal actuation mechanism at the base of the seatpost contacts any internal seat tube parts such as frame pivots or bottom bracket parts. Failure to do this risks causing damage to the frame and seatpost, potentially causing SERIOUS INJURY OR DEATH.
CAUTION: Be sure your seatpost is the correct outer diameter to fit your bicycle seat tube inner diameter. Using the incorrect size of the Transfer seatpost on your bicycle can lead to product damage, personal injury, or both.
CAUTION: Be sure the cable housing does not interfere with the swingarm linkage, rear tire, clothing and riding gear, and steering clearance. Never attach the cable housing to any part of your rear shock.
NOTE: The anodized surface of the upper seatpost, like a rear shock body, serves as a sealing surface. Always take every precaution to avoid causing abrasion damage to the anodized surface of the upper seatpost. The upper portion of the Transfer seatpost may be carefully clamped in a workstand. Do not clamp the cable pulley mechanism of collar cable routed Transfer seatposts.
WARNING: The FOX Transfer Seatpost contains pressurized nitrogen and oil. DO NOT attempt to disassemble any portion of a FOX suspension product, unless expressly instructed to do so by the applicable FOX technical documentation, and then ONLY while strictly adhering to all FOX instructions and warnings in that instance. Never attemp to remove the plug or unthread the hex at the top of the seatpost under the saddle clamps as it may cause failure or the seatpost resulting in SERIOUS INJURY OR DEATH.

Using the Transfer Seatpost
WARNING: Understand the function of the Transfer seatpost by using it in a controlled environment before your first ride. A sudden, unexpected impact from the saddle could cause you to lose control of your bicycle, potentially causing SERIOUS INJURY OR DEATH
Understand the basics before using your Transfer seatpost:
- Press and hold the lever during height changes: Press and hold the lever to change saddle heights. Releasing the lever will set the post in its current height.
- Guide your saddle as you change heights: Use your body to press the saddle down as you change to lower saddle height settings and to guide your saddle as it returns to higher settings.
- Release the remote lever before releasing saddle control: When changing seatpost height, always release the remote lever first before releasing control of the saddle with your body.
- Practice within your abilities: Developing intuitive expertise using the Transfer seatpost may take some practice. Practice safely operating the Transfer seatpost in a controlled riding environment, before using it in a more technical riding situation.
The FOX Transfer Seatpost is not directional and can be installed into the frame with either side facing forward. The saddle clamps are directional. The lower saddle clamp must be positioned with the longer rail supports oriented toward the rear. The upper saddle clamp must be positioned with the portion of the clamp that hangs below the rails oriented toward the rear.

Installing the Transfer Seatpost (Internal Cable Routing)
Follow these instructions to install an internally routed Transfer Seatpost
Use the video and printed instructions below to guide you through the process of installing the FOX Transfer Seatpost with Internal Cable routing.
- Install the remote lever onto your handlebar. Do not exceed 1.7 Nm (15 in-lb). Less torque may be needed for carbon bars. Refer to the handlebar manufacturer's instructions for use with carbon bars. Make sure to check for clearance between the remote lever and any brake or shifter controls.


- Route cable housing from your lever into your frame's internal routing port. Push the housing through the frame until the housing emerges from the seat tube and extends approximately 2in (50mm) beyond the seat collar. Install a ferrule on the seatpost end of the cable housing.
- Install the cable bushing onto the inner wire making sure to seat the cable head in the counterbore of the cable bushing. Thread the cable through the cable housing starting from the seatpost end.

- Hook the cable bushing onto the actuation lever at the bottom of the seatpost, seating it fully. Pull the exposed inner wire at the lever end of the housing while pushing the cable housing into the frame to seat the housing against the cable stop at the base of the seatpost.
- Insert the seatpost into the seat tube while you pull cable housing and inner wire from the frame's internal routing port. Set the seatpost at your approximate desired ride height.
- Determine how much cable housing you will need between your lever and your frames internal routing port. Make sure to allow enough slack for proper steering clearance. Mark the housing where you intend to cut, but do not cut it yet.
- Remove the seatpost from the seat tube, leaving approximately 2in (50mm) of housing beyond the seat collar. Unhook the cable bushing from the actuation lever at the base of the seatpost. Pull the inner wire out of the cable housing routed through your frame.
- Cut the housing at the mark made in step 6. Install a ferrule onto the lever end of your cable housing. Lightly lubricate the inner cable and thread it through the cable housing starting at the seatpost end.
- Hook the cable bushing onto the actuation lever at the bottom of the seatpost, seating it fully. Pull the exposed inner wire at the lever end of the housing while pushing the cable housing into the frame to seat the housing against the cable stop at the base of the seatpost.
- Insert the seatpost into the seat tube while you pull cable housing and inner wire from the frame's internal routing port (you may use friction paste with carbon frames if necessary). Set the seatpost at your approximate desired ride height. Tighten your seat collar binder bolt to 45-65 in-lb (5.1-7.3 Nm) torque. Excessive seat tube collar binder bolt tightness can cause the upper seatpost to bind within the lower seatpost.
- Thread the inner wire through your lever starting at the barrel adjuster. Pull the inner wire tight to seat all housing. While holding the lever in it's fully extended position, tighten the pinch bolt to 11 in-lb (1.2 Nm).
- Actuate the lever fully 5-10 times, then recheck the lever for any cable slack. Retighten the pinch bolt if necesarry and adjust cable tension with the barrel adjuster if needed.
- Cut the inner wire to the correct length so that you can tuck the cable end into the lever body after installing an end crimp. Install the end crimp and tuck the end of the inner wire into the recess in the underside of the lever body.
- Place the lower saddle clamp on the seatpost with the longer rail supports oriented toward the rear.
- NOTE: The FOX Transfer Seatpost can be used with saddles built with 7mm round or 7mm x 9mm obround or elliptical carbon rails. The FOX Transfer Seatpost cannot be used with saddles built with 8mm round rails.
- Place the upper saddle clamp on top of the saddle rails with the portion of the clamp that hangs below the rails oriented toward the rear. Install the two saddle clamp bolts with their spherical washers and barrel nuts.
- After confirming your final saddle level and fore/aft position, tighten the saddle clamp bolts to 60 in-lb (6.8 Nm).
Installing the Transfer Seatpost (Collar Cable Routing)
Follow these instructions to install an collar routed Transfer Seatpost
- Install the remote lever onto your handlebar. Do not exceed 1.7 Nm (15 in-lb). Less torque may be needed for carbon bars. Refer to the handlebar manufacturer's instructions for use with carbon bars. Make sure to check for clearance between the remote lever and any brake or shifter controls.
- Insert the seatpost into the seat tube (you may use friction paste with carbon frames if necessary). Rotate the Transfer Seatpost in the seat tube to choose which side, left or right, to position the cable pulley.
- Set the seatpost at your approximate desired ride height. Tighten your seat collar binder bolt to 45-65 in-lb (5.1-7.3 Nm) torque. Excessive seat tube collar binder bolt tightness can cause the upper seatpost to bind within the lower seatpost.
- The path for mounting the cable housing on frames can vary, so carefully assess all options before choosing. Route your cable housing from the lever to the seatpost with the largest bend radius possible, to avoid sharp cable housing bends that can add to cable friction. Make the overall cable housing as short as possible, allowing just enough slack to ensure smooth cable operation and steering clearance.
- Cut the cable housing to length and install ferrules on both ends. Fasten the cable housing to your frame with the provided zip ties.
- Lightly lubricate the inner cable and thread it through the cable housing starting at the seatpost end. Fully seat the cable head in the pulley at the seatpost.

- Pull the exposed inner wire at the lever end of the housing while pushing the cable housing to seat the housing against the cable stop at the seatpost pulley.
- Thread the inner wire through your lever starting at the barrel adjuster. Pull the inner wire tight to seat all housing. While holding the lever in it's fully extended position, tighten the pinch bolt to 11 in-lb (1.2 Nm).
- Actuate the lever fully 5-10 times, then recheck the lever for any cable slack. Retighten the pinch bolt if necesarry and adjust cable tension with the barrel adjuster if needed.
- Cut the inner wire to the correct length so that you can tuck the cable end into the lever body after installing an end crimp. Install the end crimp and tuck the end of the inner wire into the recess in the underside of the lever body.
- Place the lower saddle clamp on the seatpost with the longer rail supports oriented toward the rear.
- NOTE: The FOX Transfer Seatpost can be used with saddles built with 7mm round or 7mm x 9mm obround or elliptical carbon rails. The FOX Transfer Seatpost cannot be used with saddles built with 8mm round rails.
- Place the upper saddle clamp on top of the saddle rails with the portion of the clamp that hangs below the rails oriented toward the rear. Install the two saddle clamp bolts with their spherical washers and barrel nuts.
- After confirming your final saddle level and fore/aft position, tighten the saddle clamp bolts to 60 in-lb (6.8 Nm).
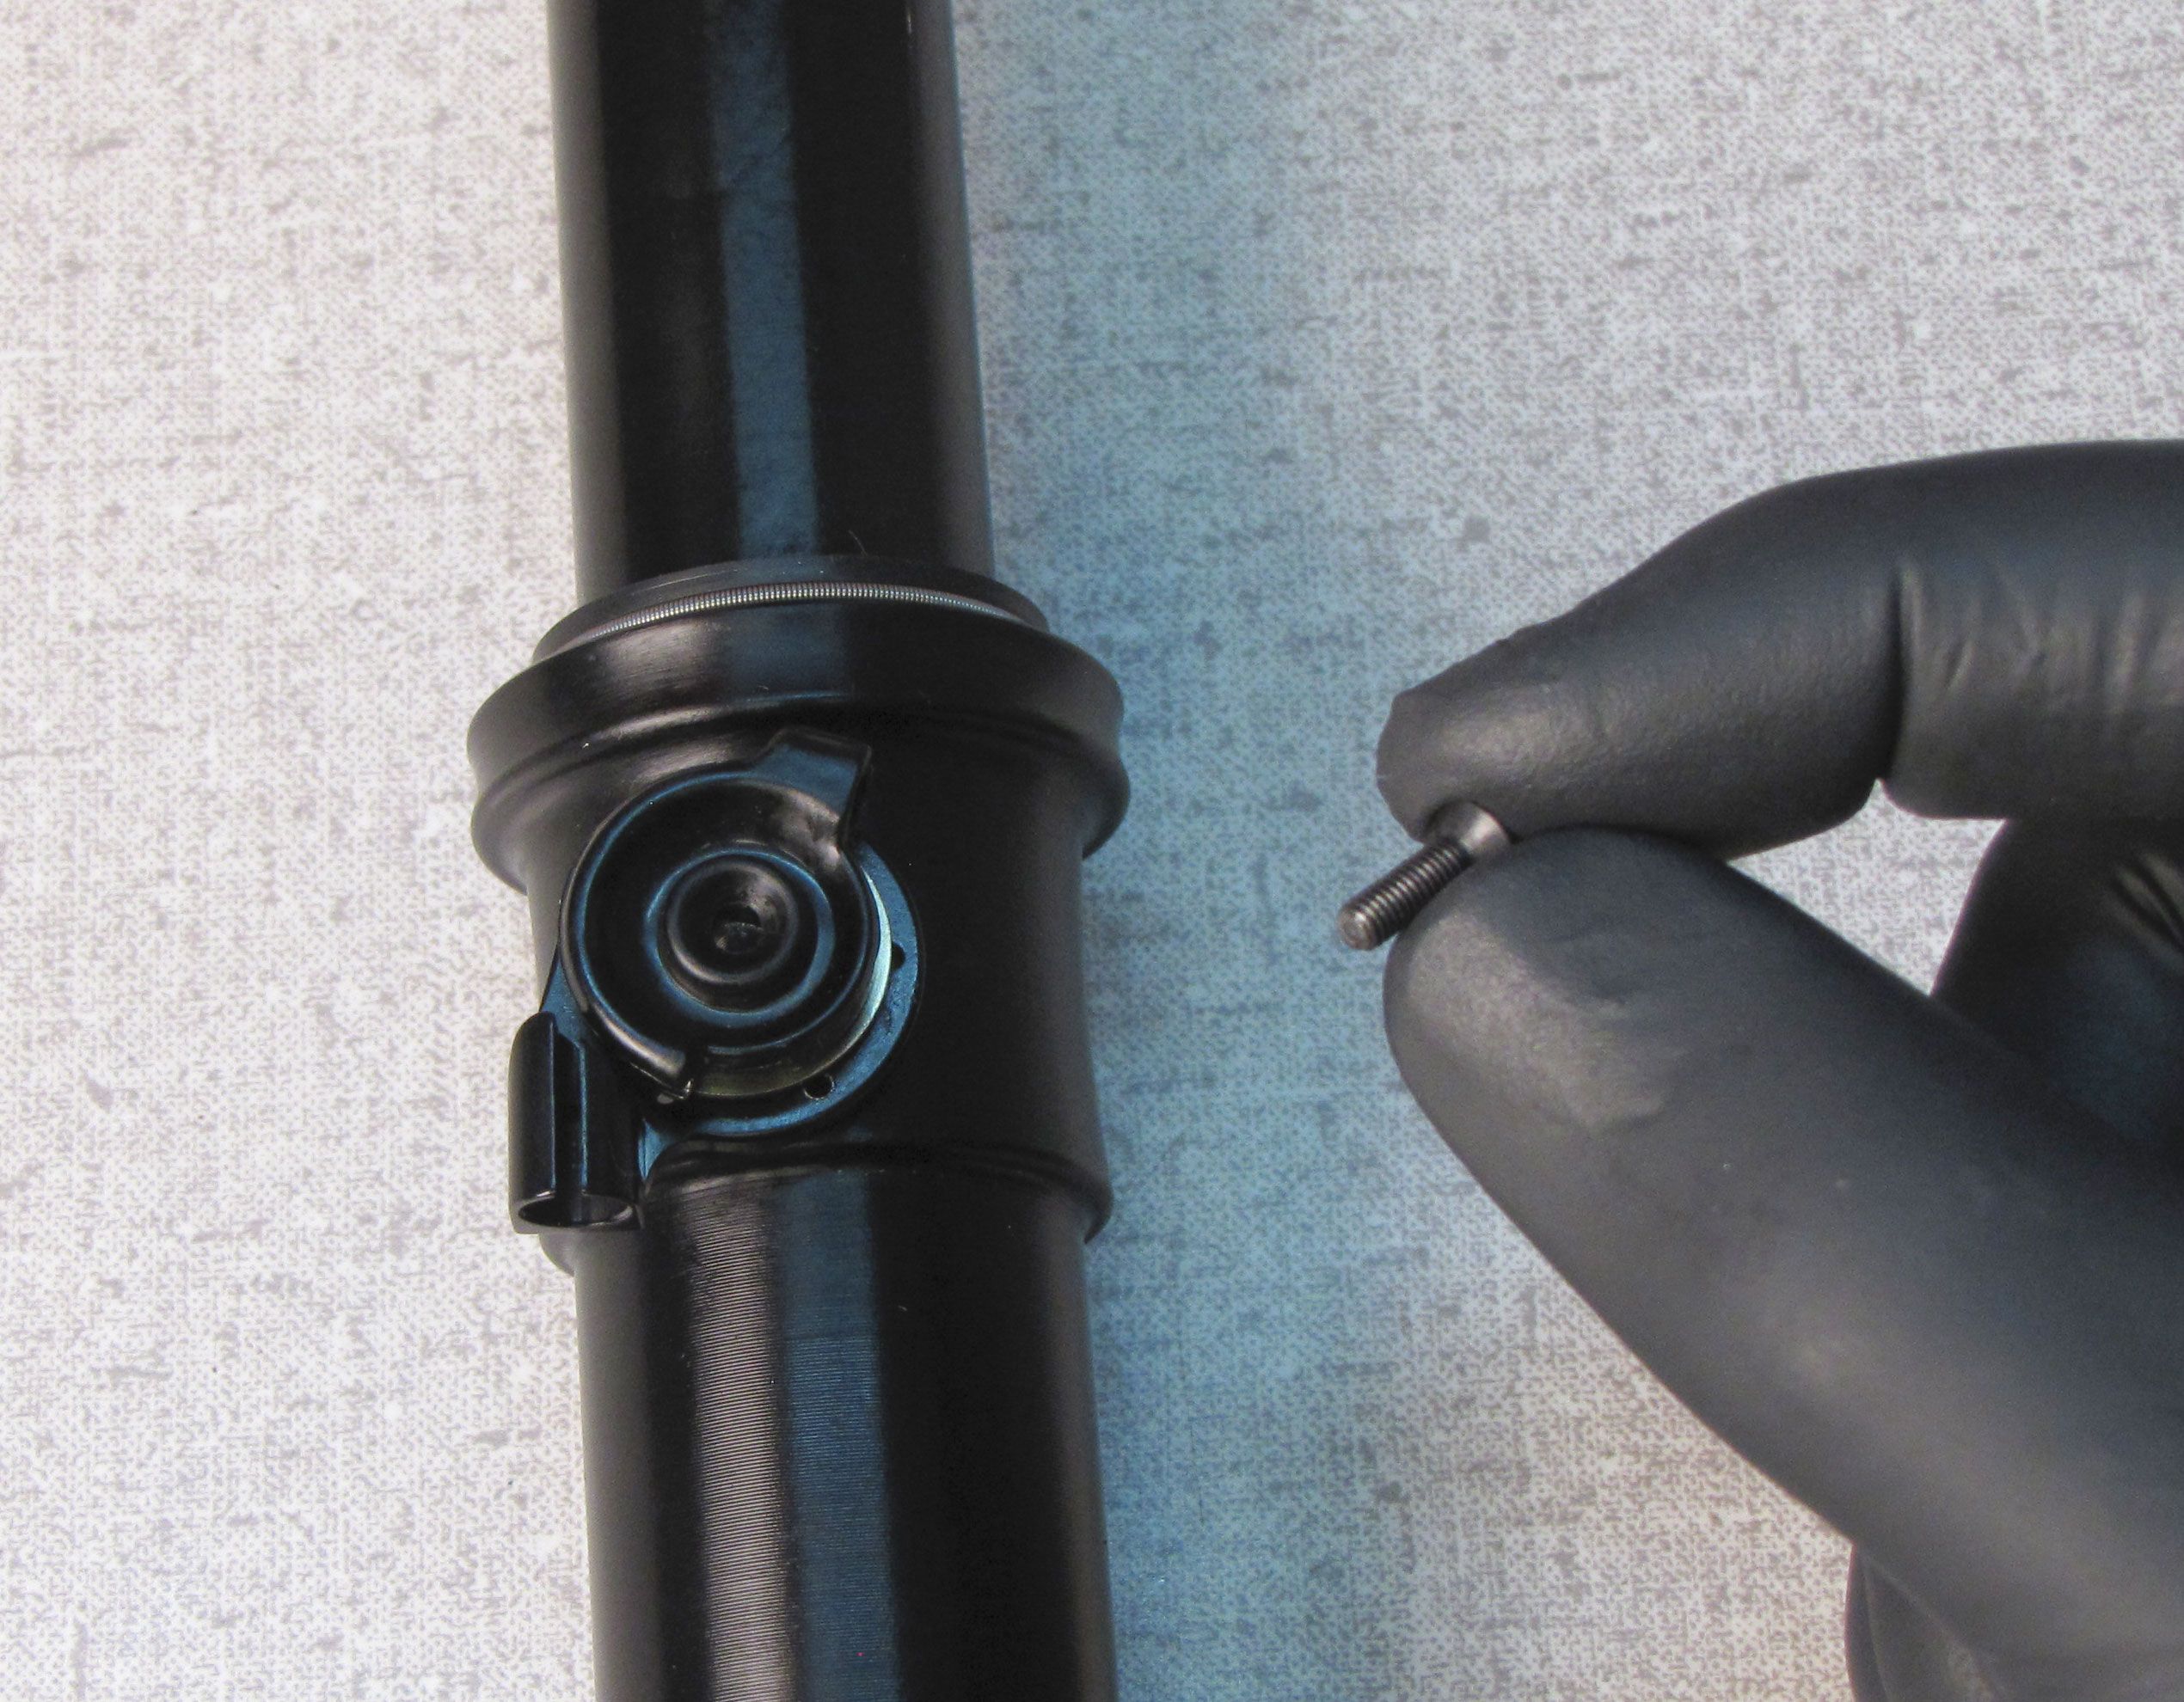
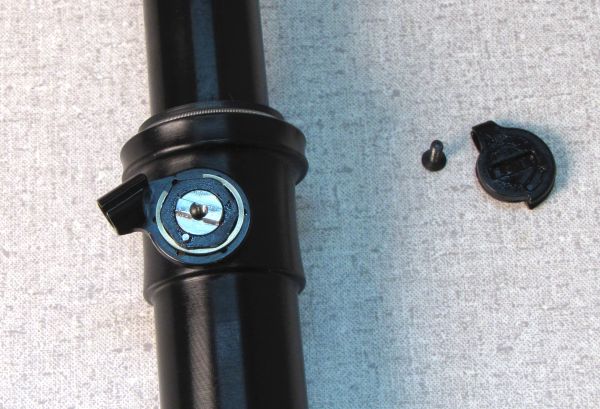
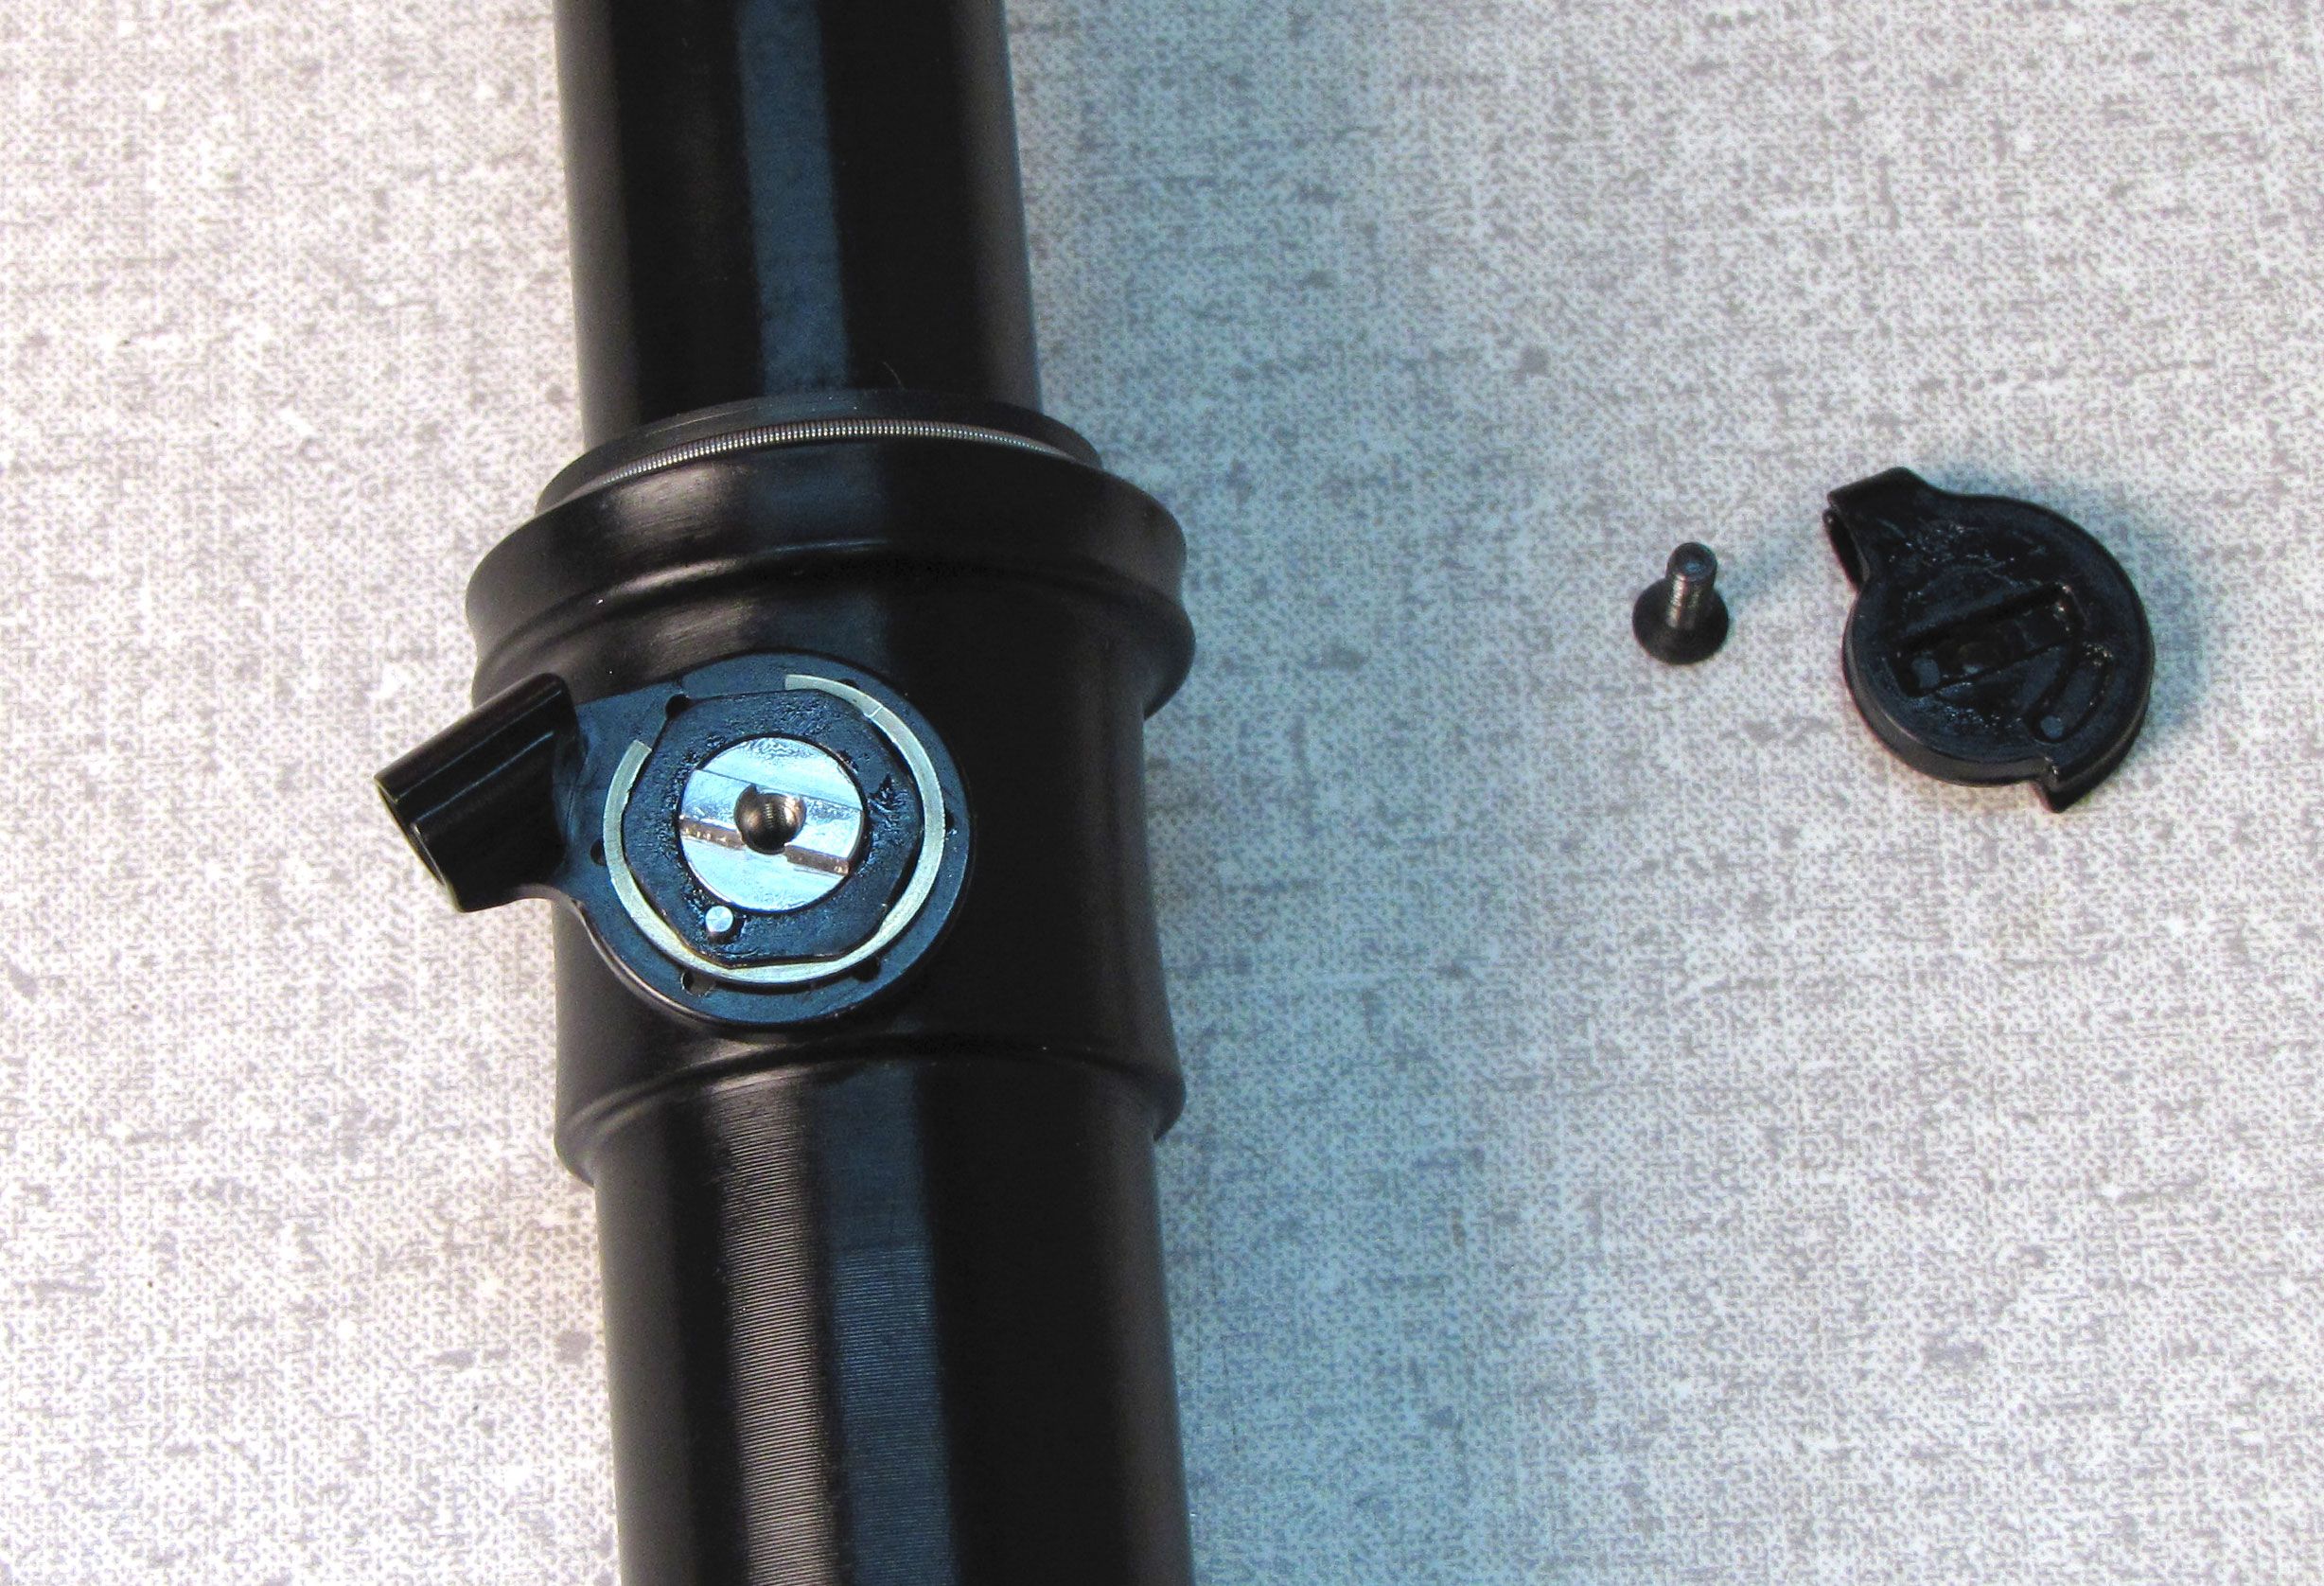
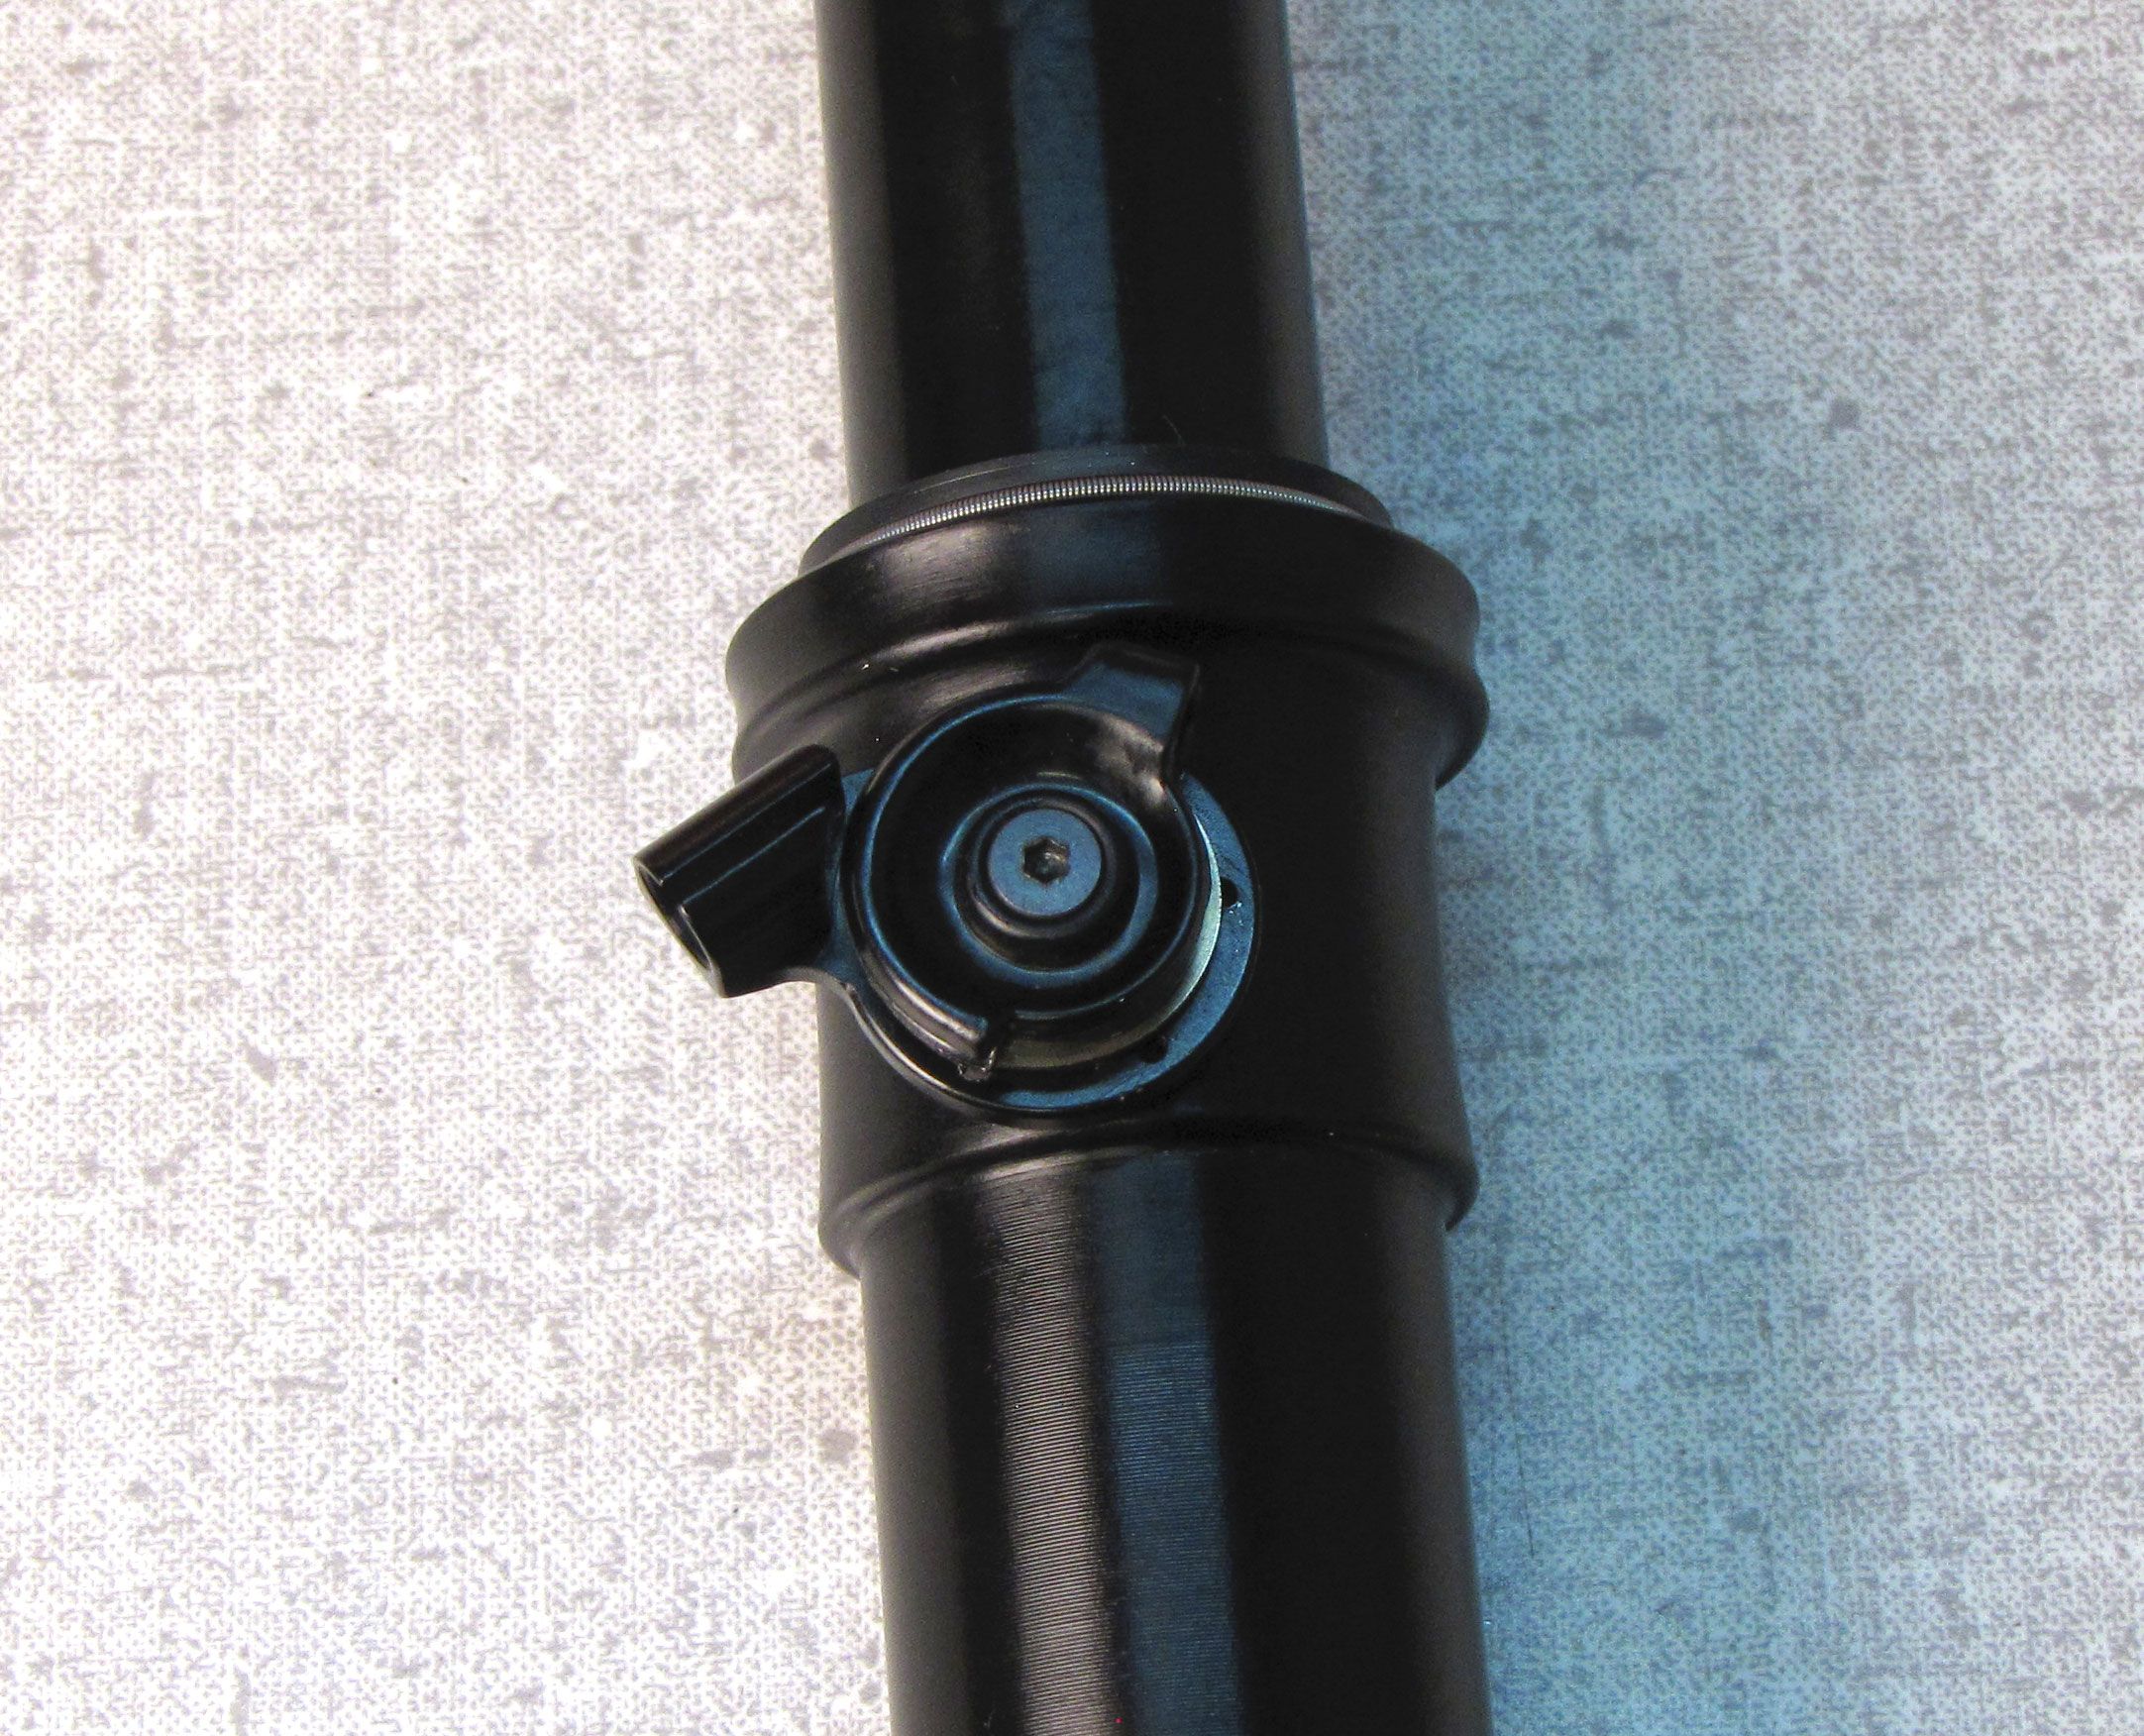
Reorienting the Cable Stop (Collar Cable Routing)
The cable housing stop of the collar routed Transfer seatpost can easily be reoriented to provide smooth cable routing on frames with various cable routing options.
The stock orientation of the cable housing stop is down, inline with the seatpost. The cable housing stop can be reoriented approximately 60 degrees forward or rearward from the original inline position to allow for the smoothest possible routing on any frame style.

The instructions below guide you through the process of reorienting the cable housing stop of the collar routed Transfer seatpost.
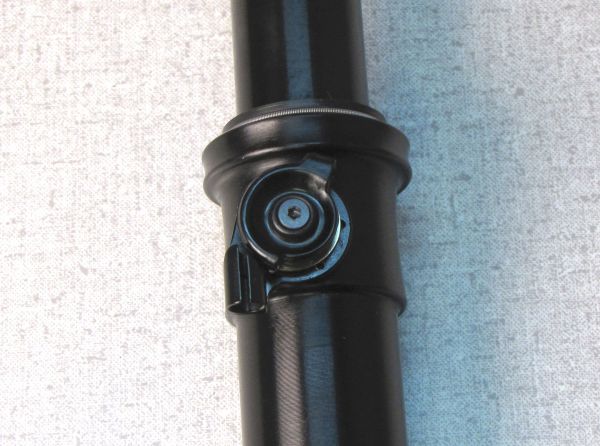
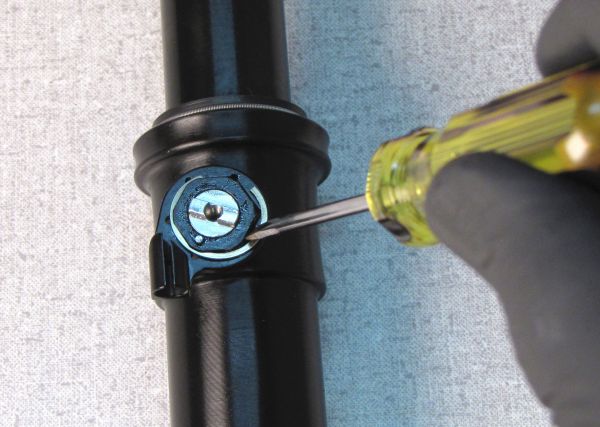
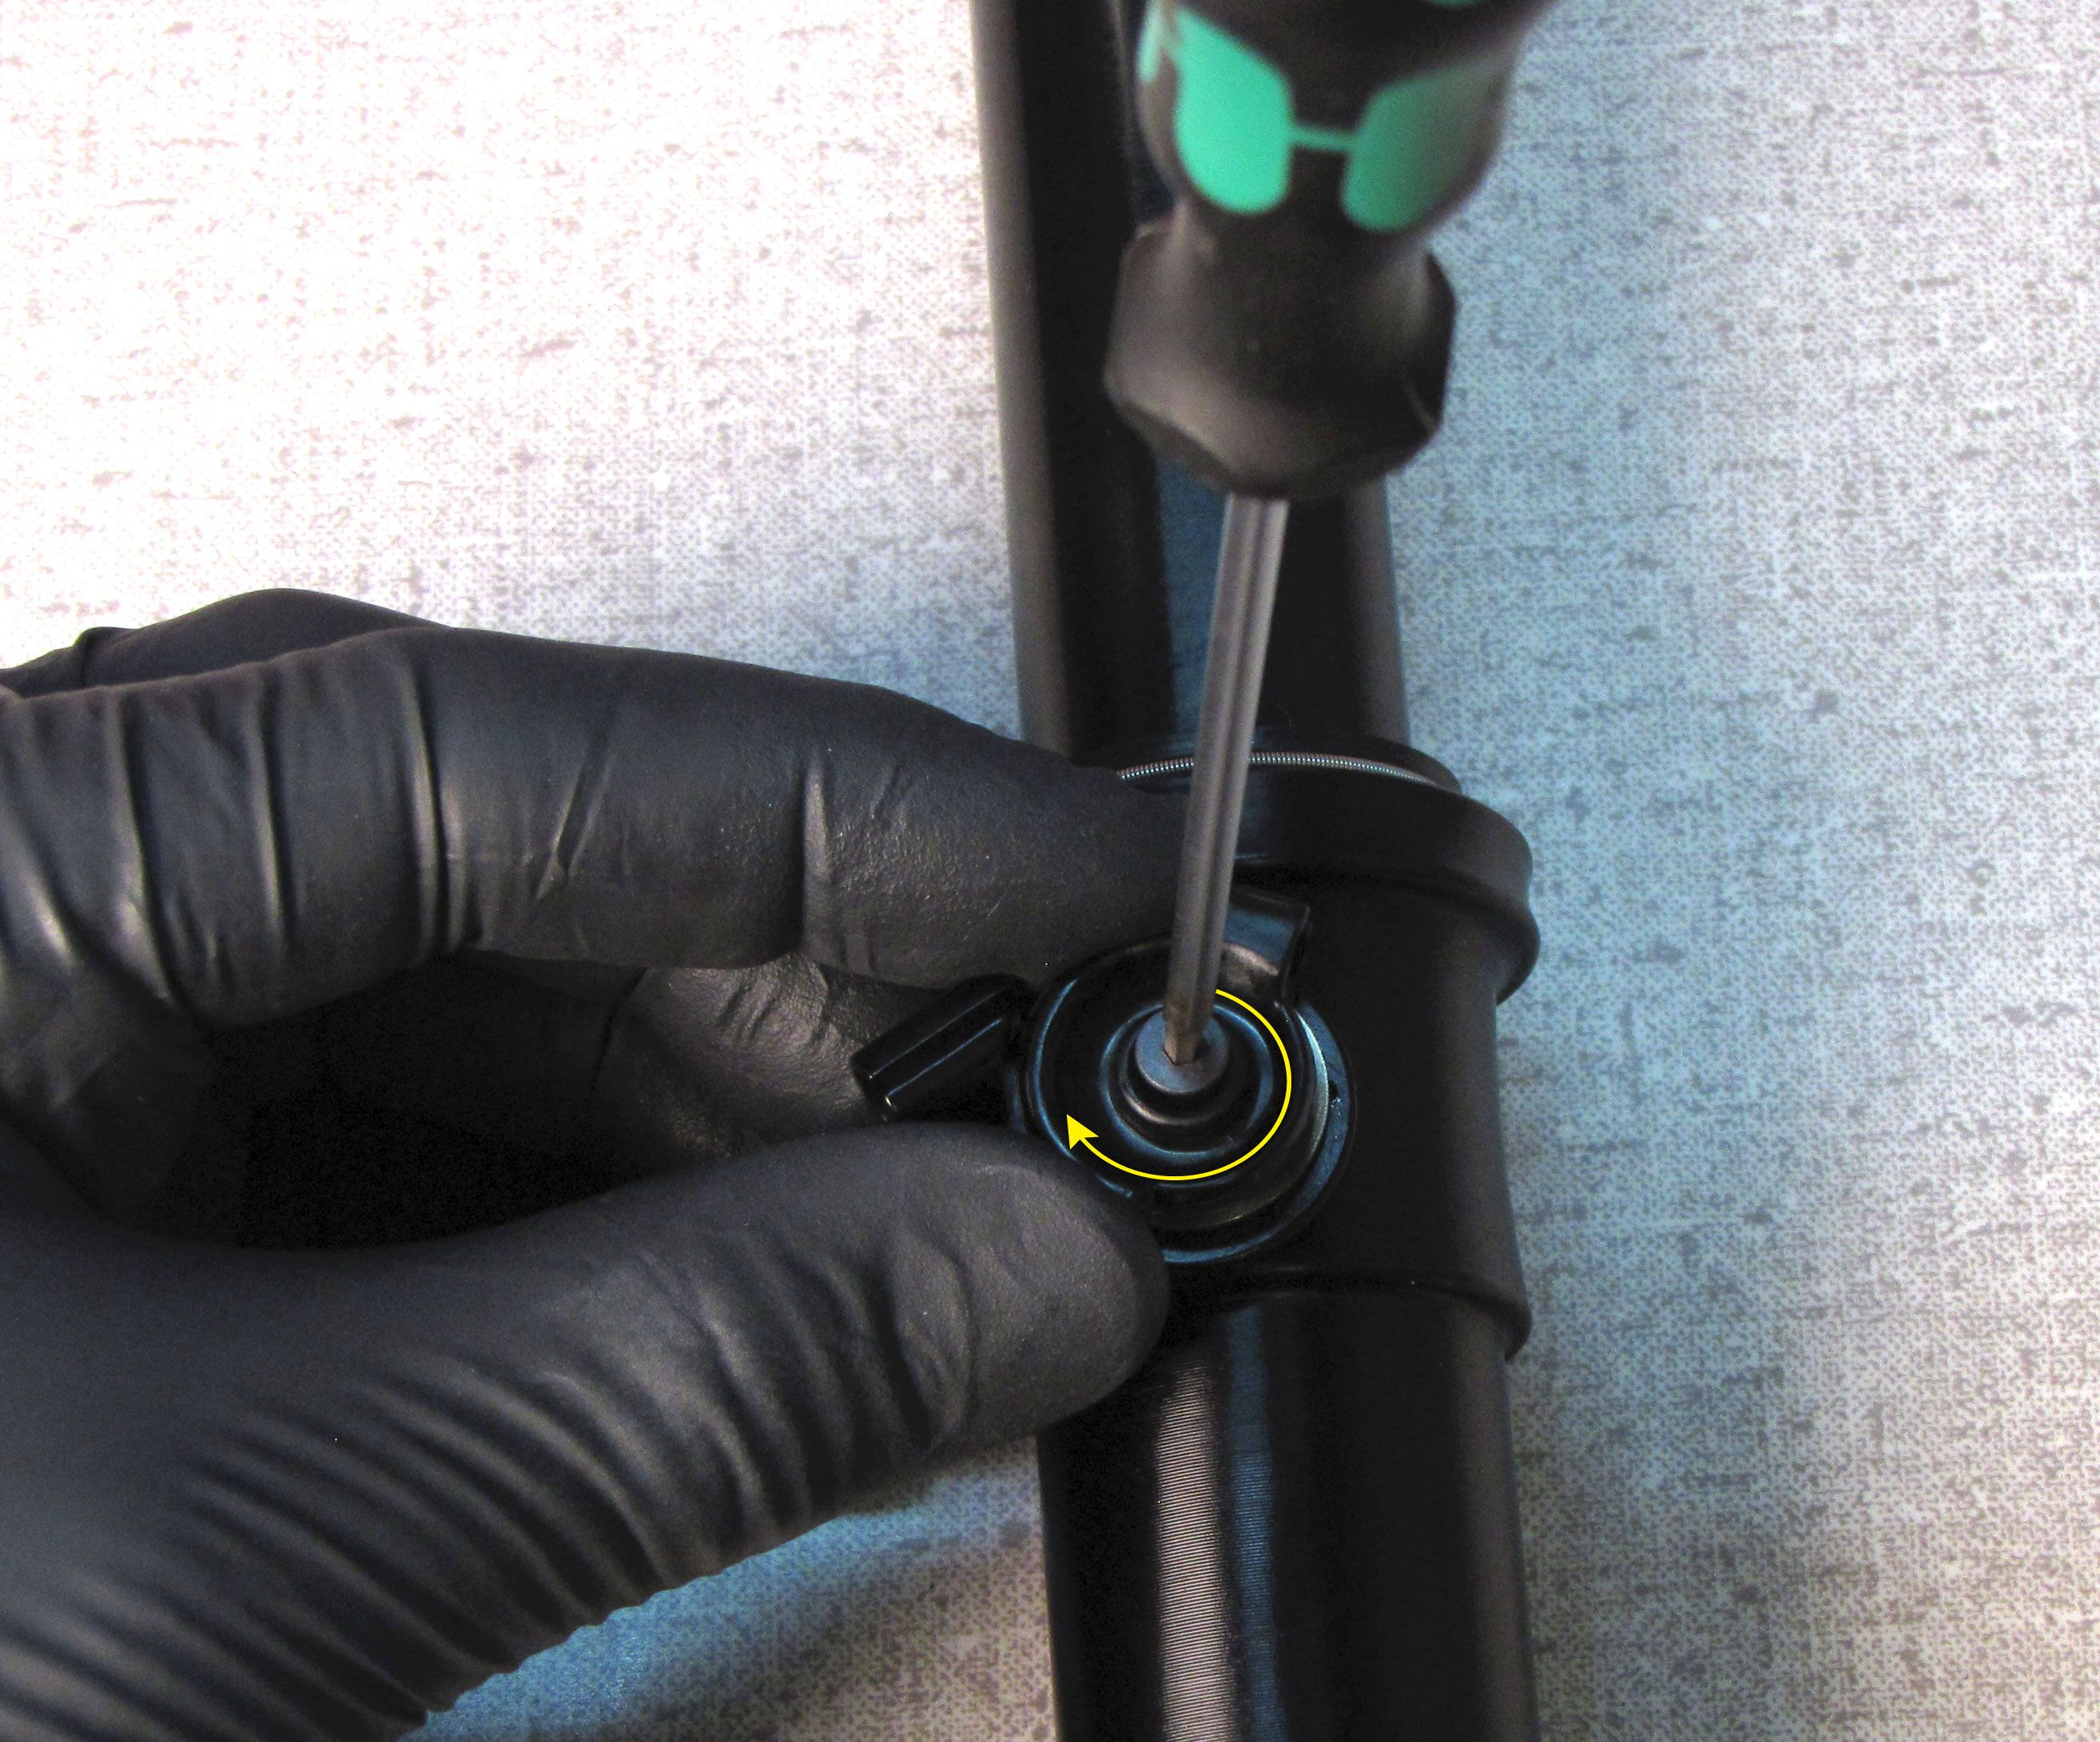
Step 1
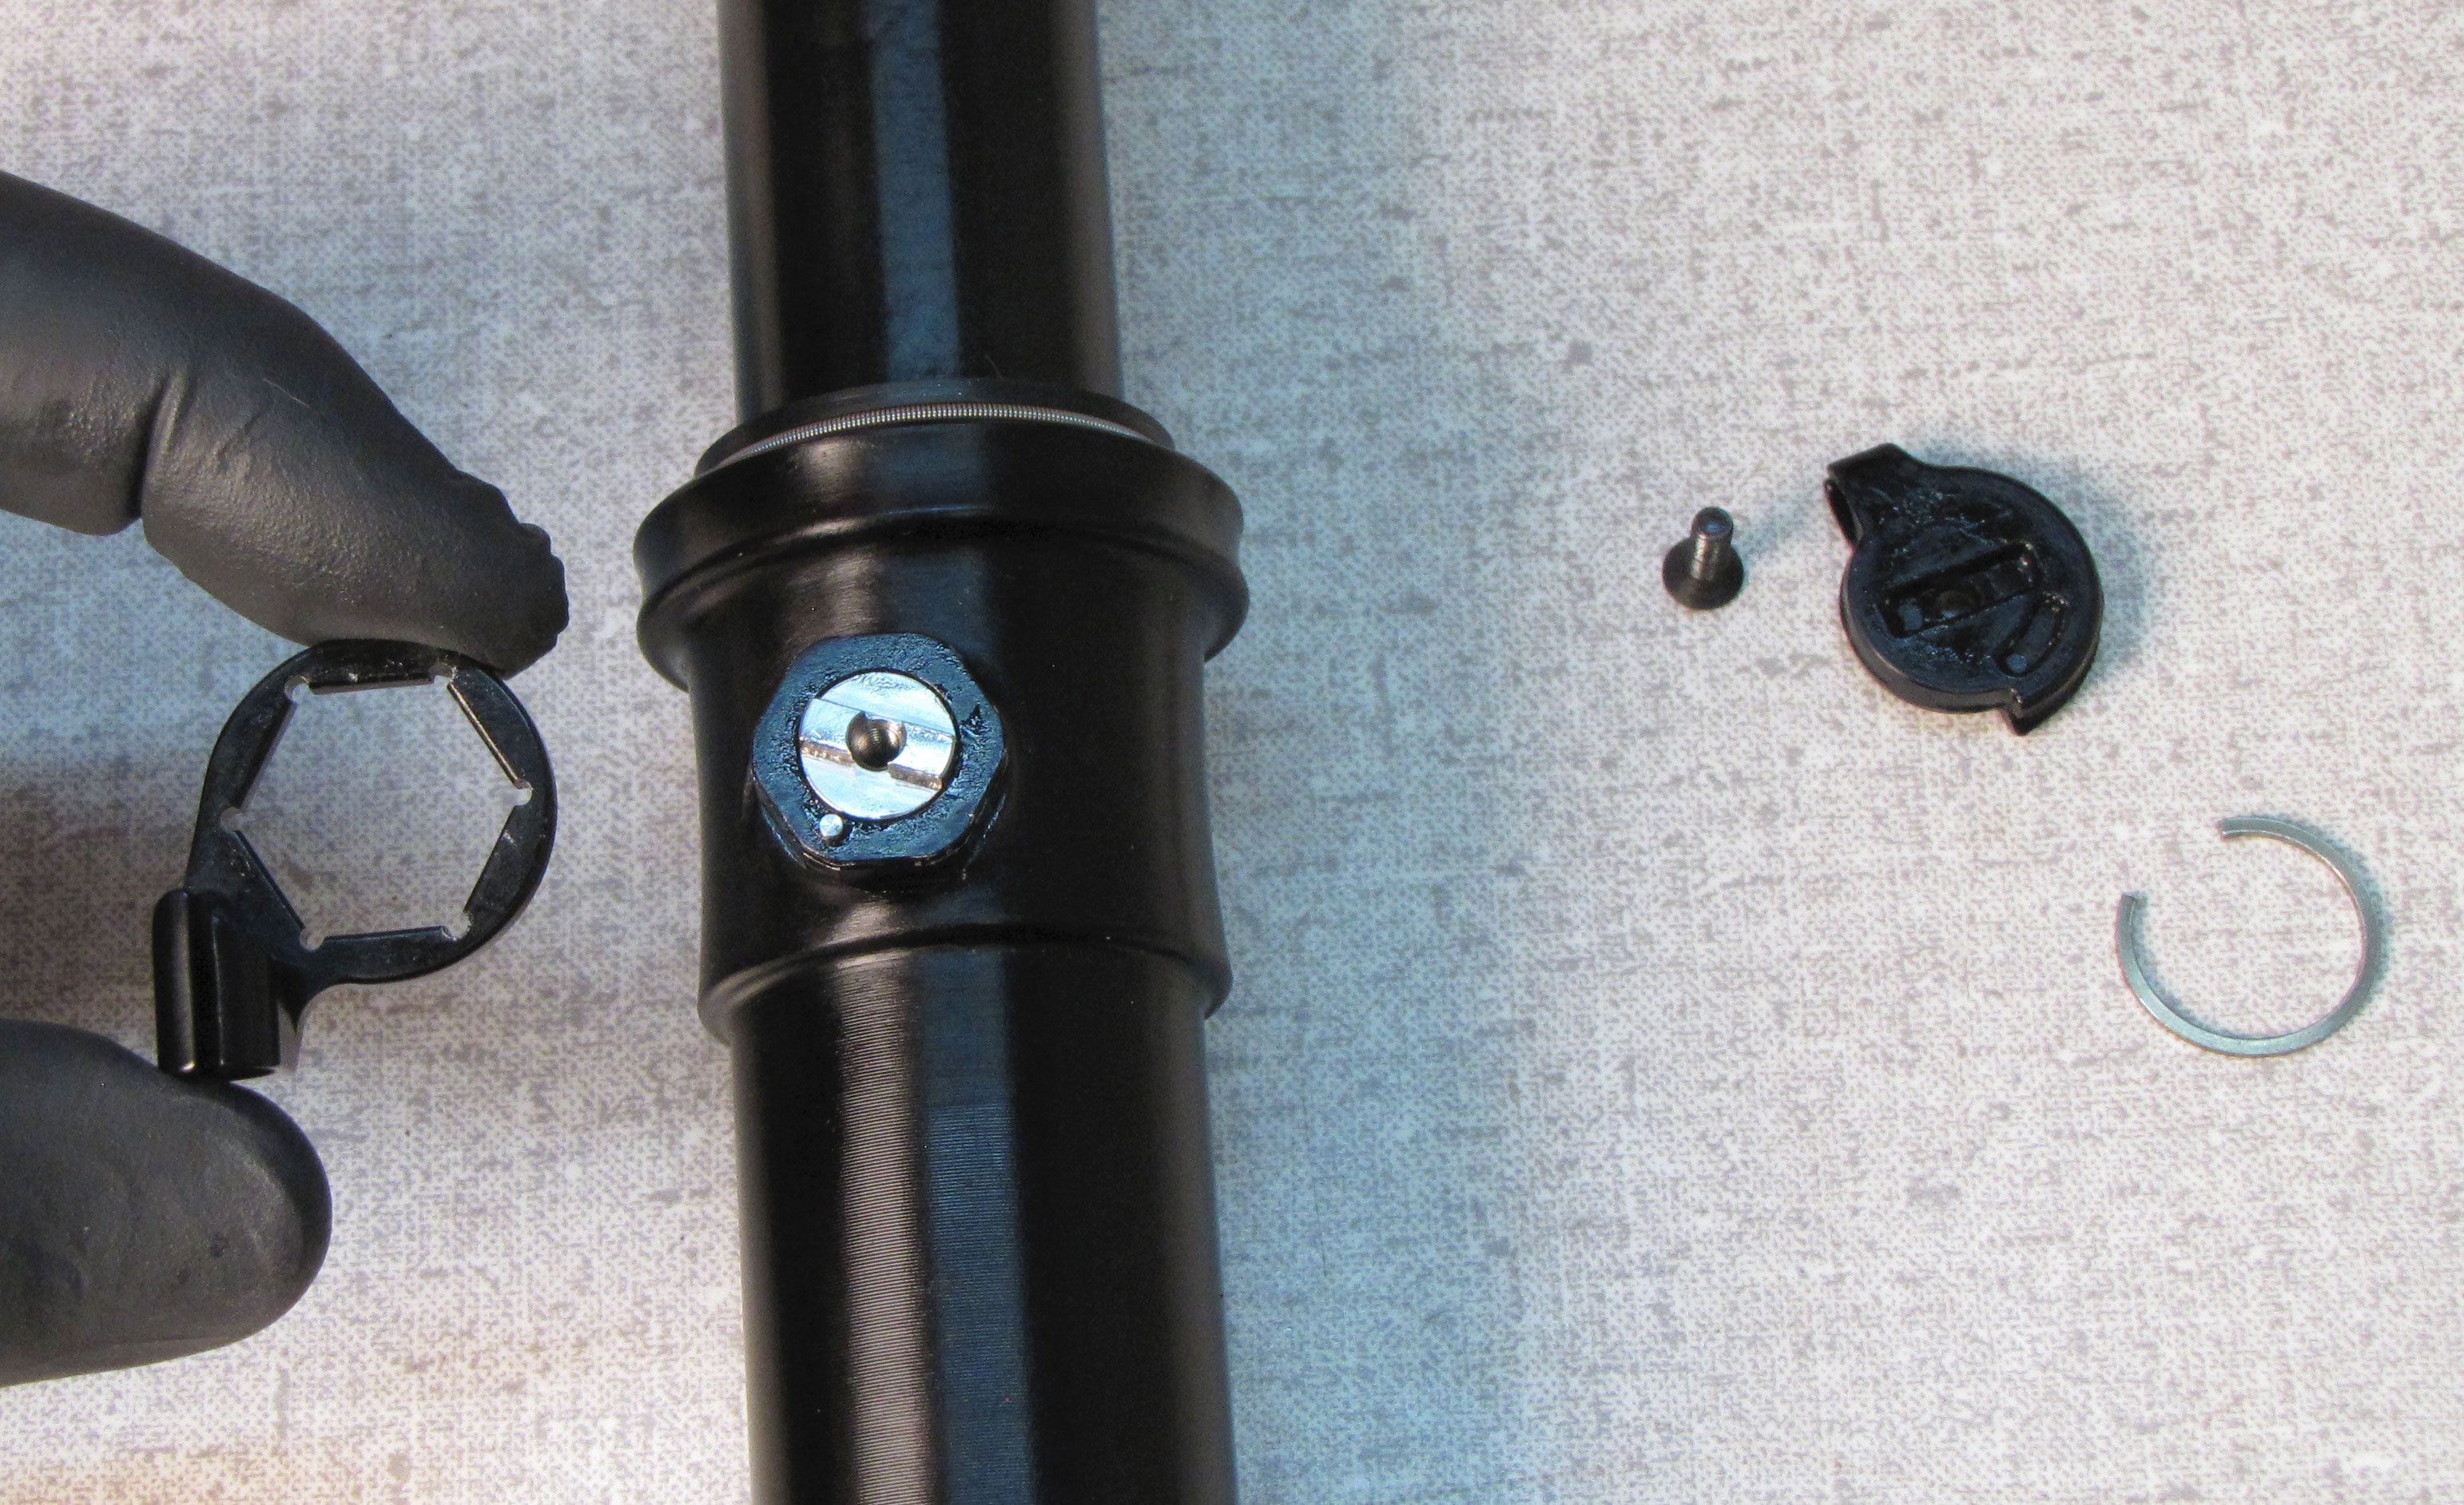
Remove the set screw by unthreading it counter-clockwise with your 2mm hex wrench. Lift the black pulley off of the seatpost to remove.
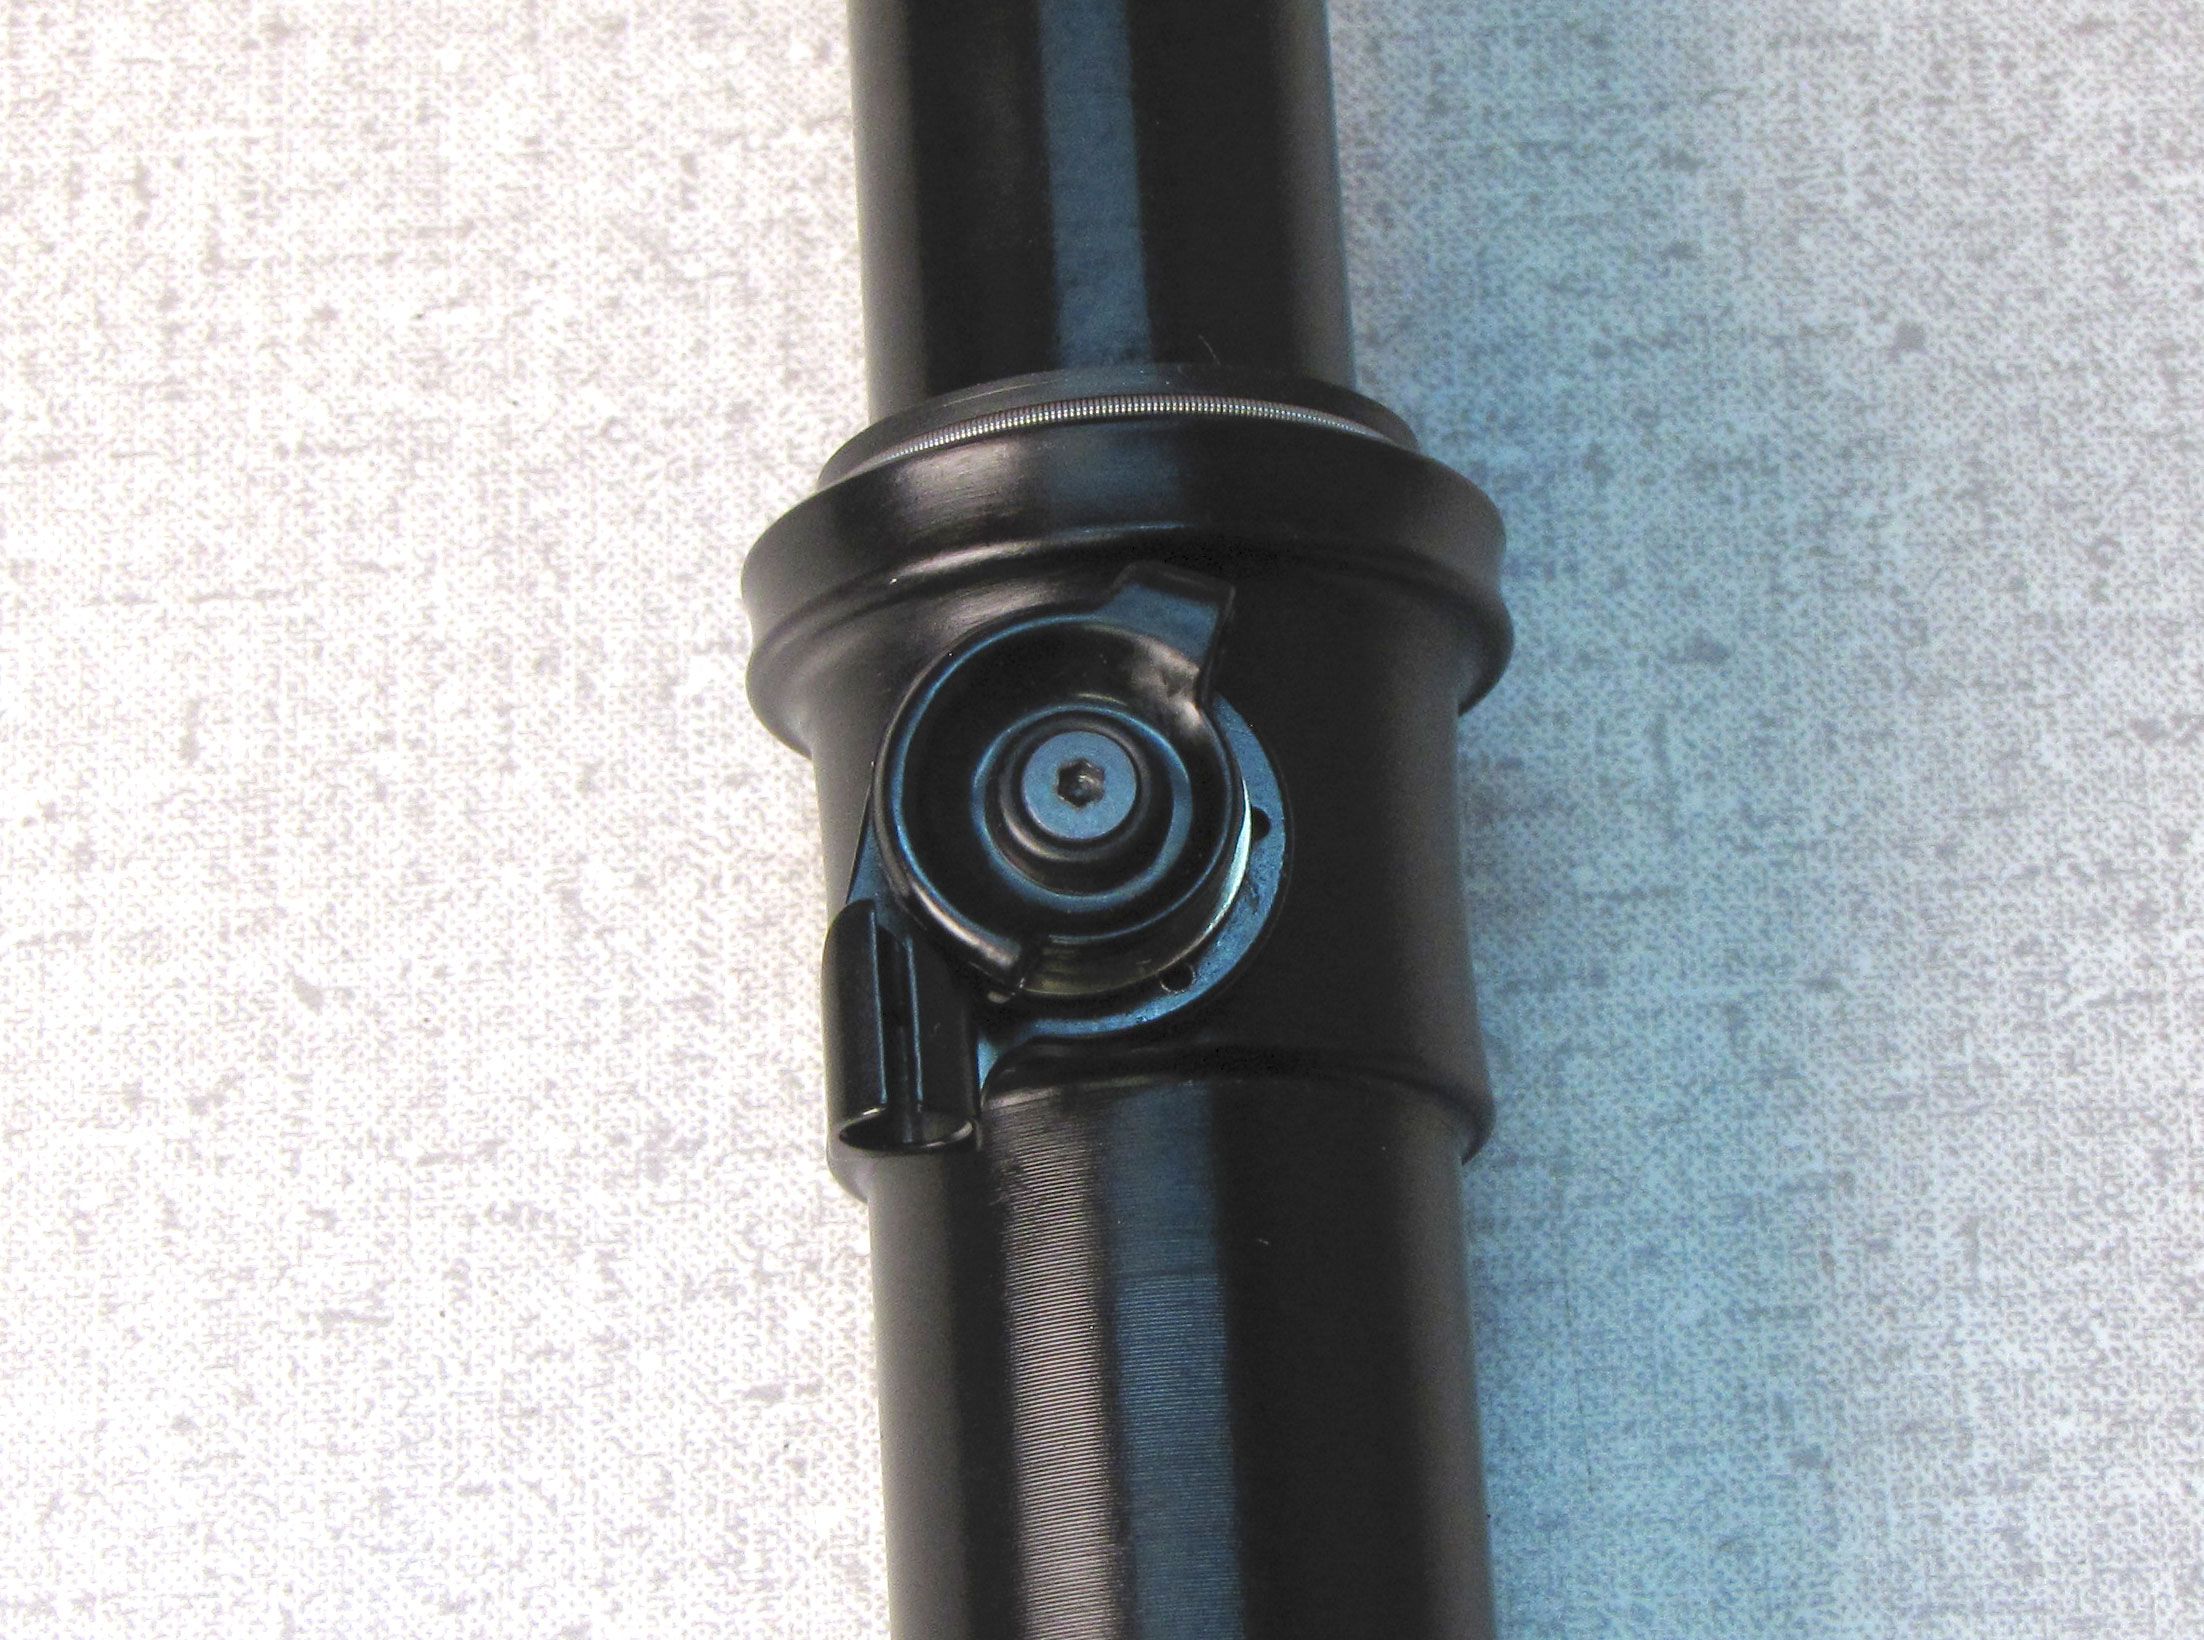

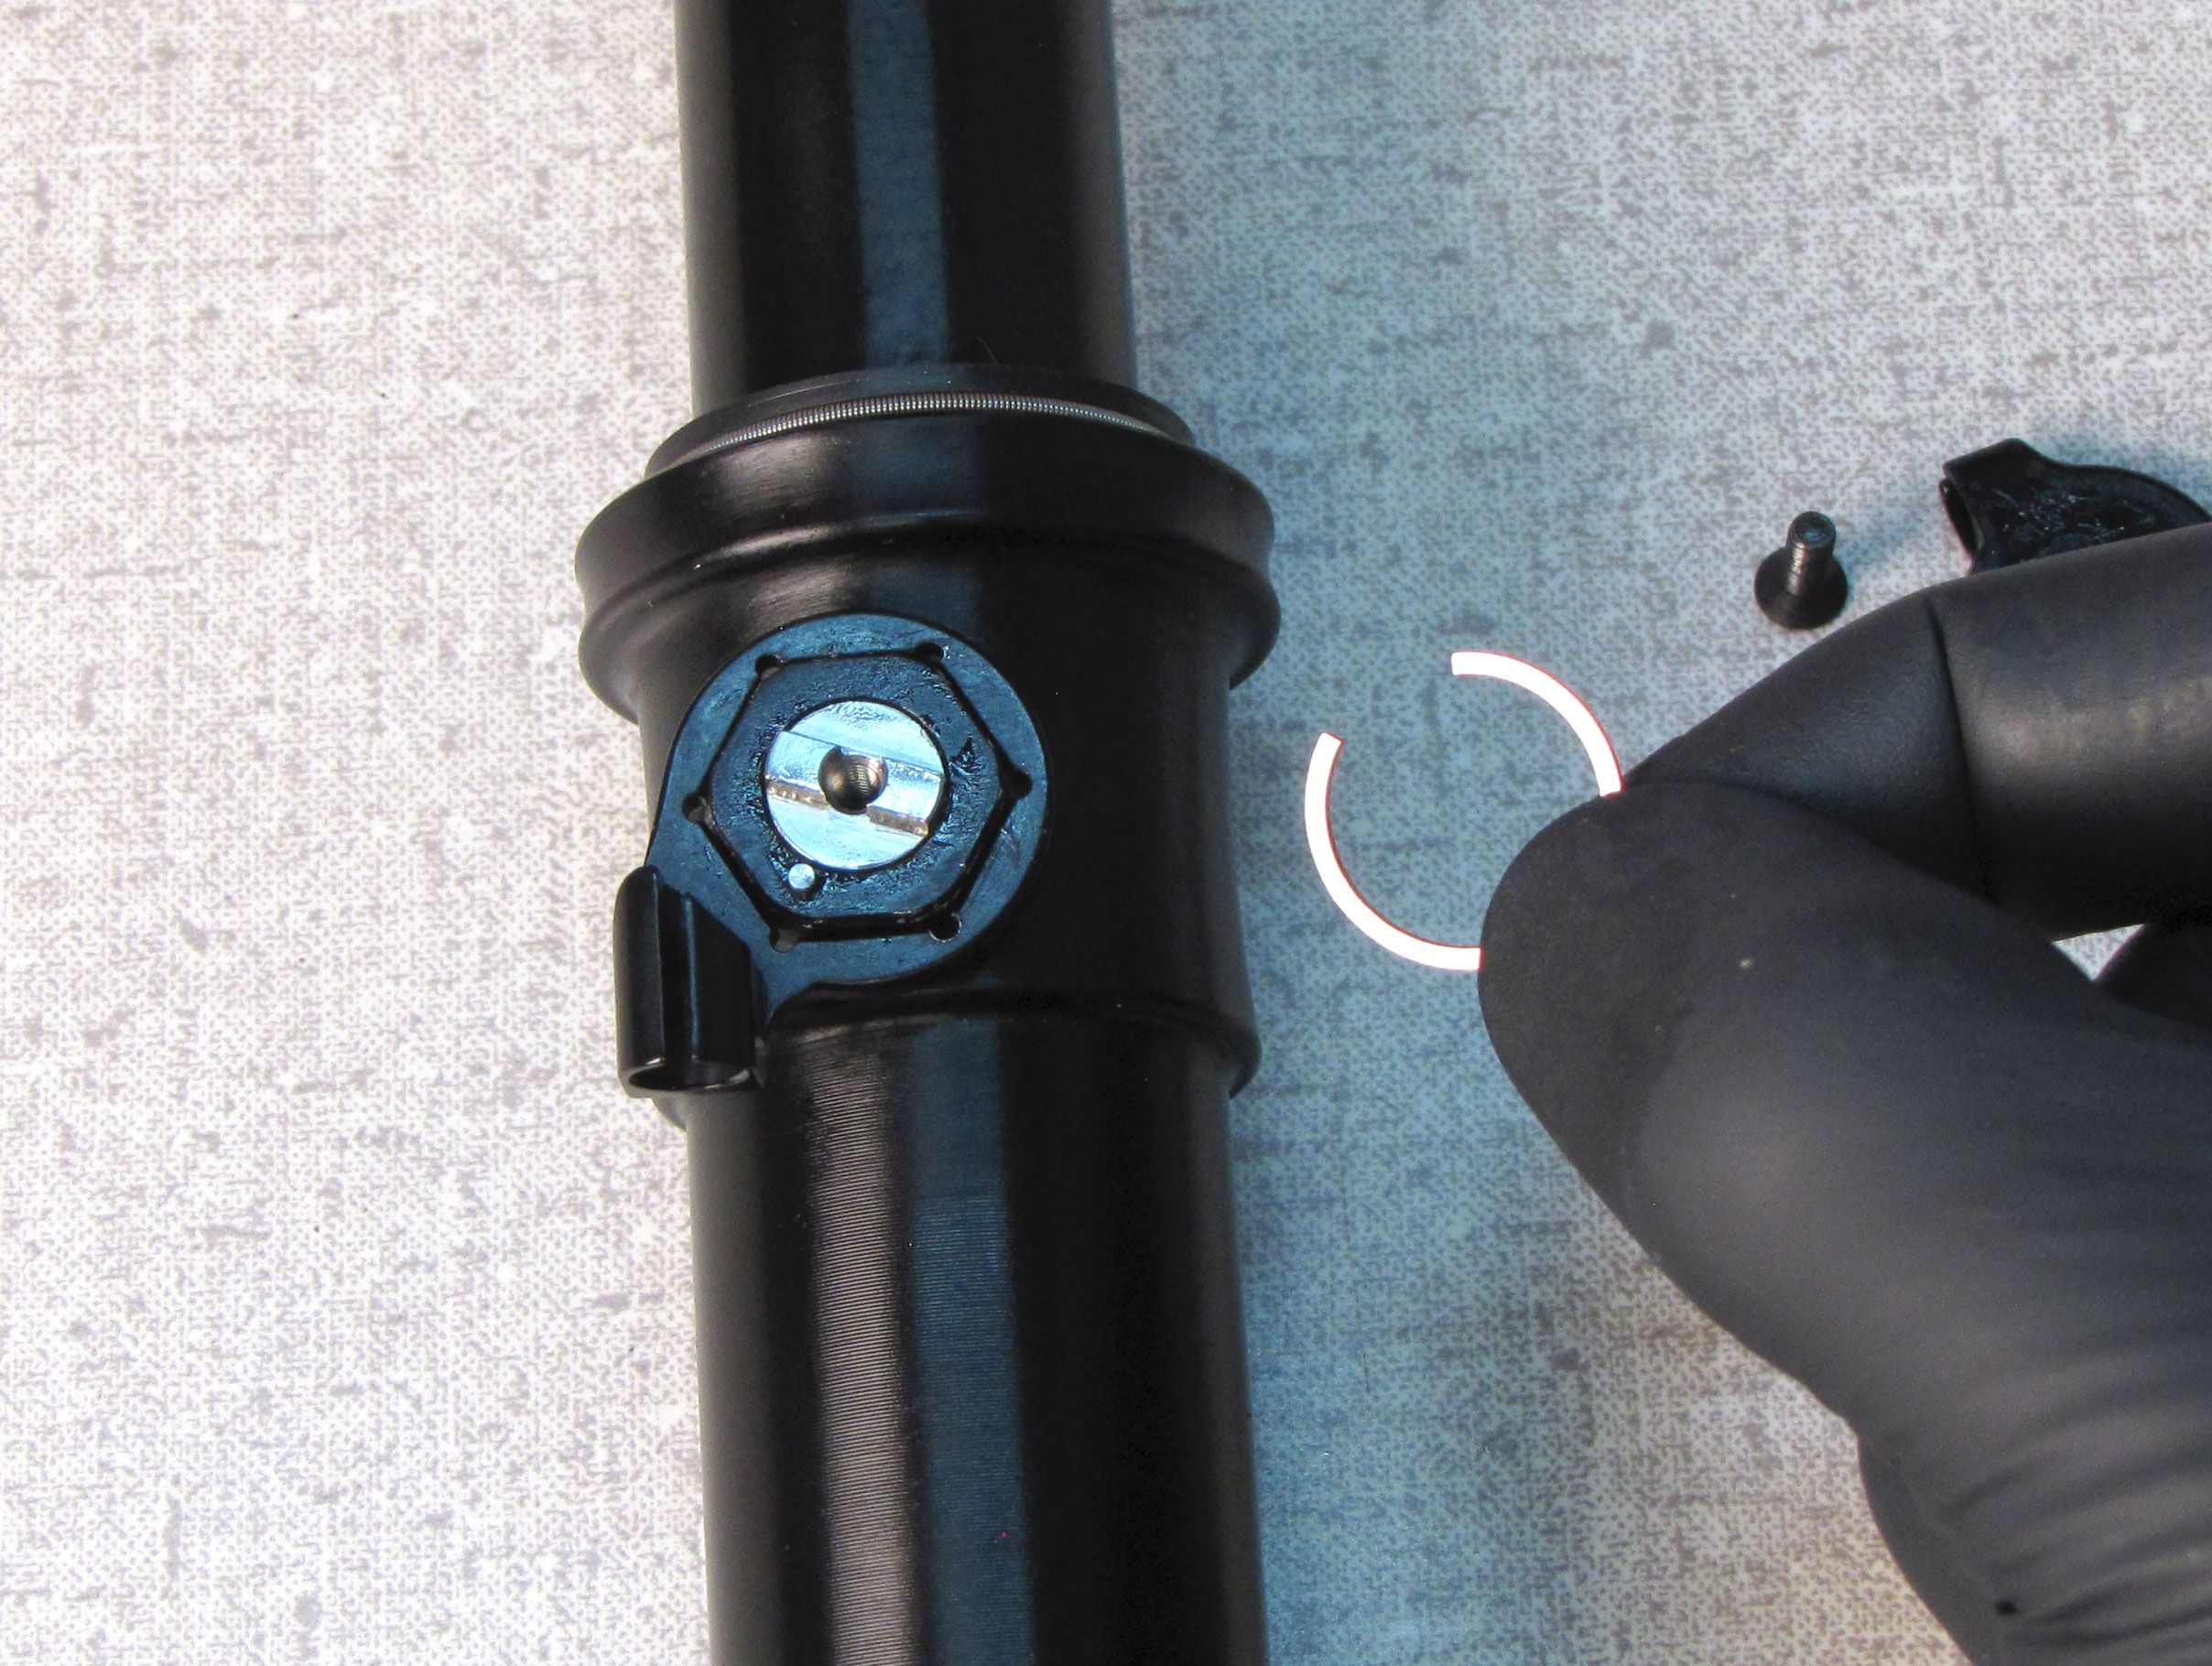
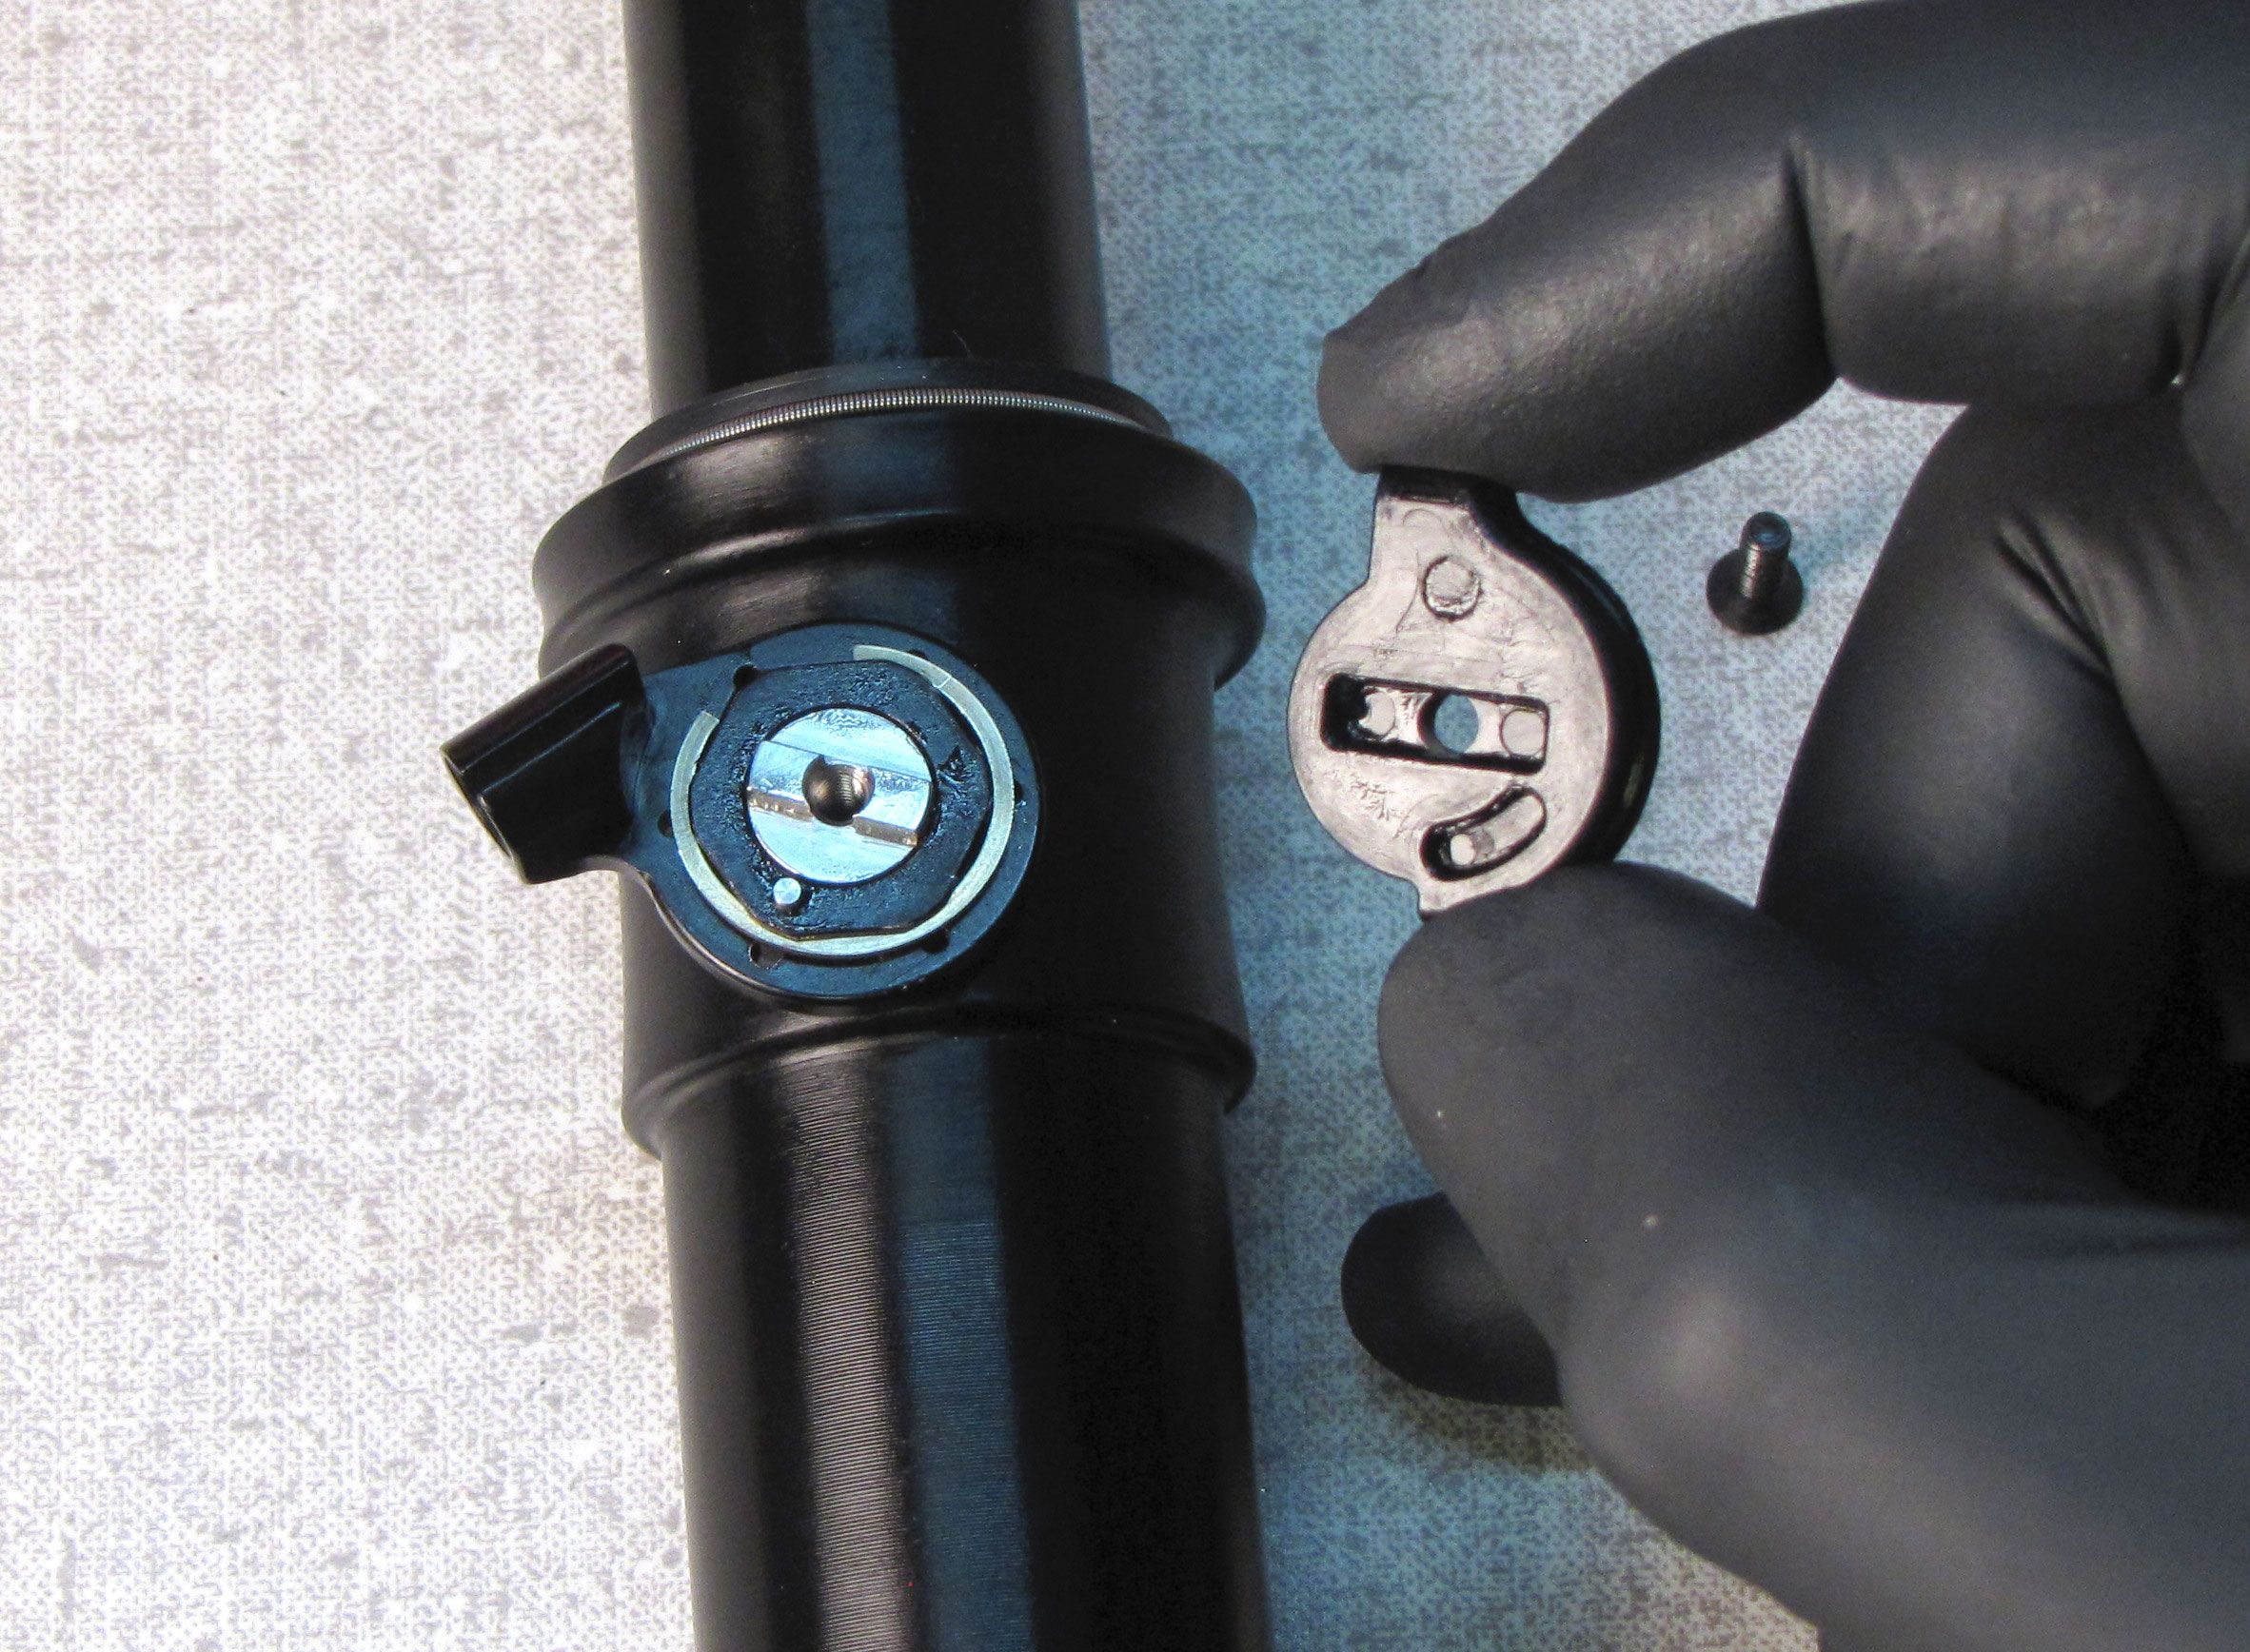
Step 2
Remove the retaining ring. Lift off the cable housing stop to remove. Reposition the cable housing stop in your desired orientation to allow for the smoothest possible cable routing on your frame.
The cable housing stop can only be used in one of three positions:
- Straight down (Stock position)
- 60 degrees forward
- 60 degrees rearward


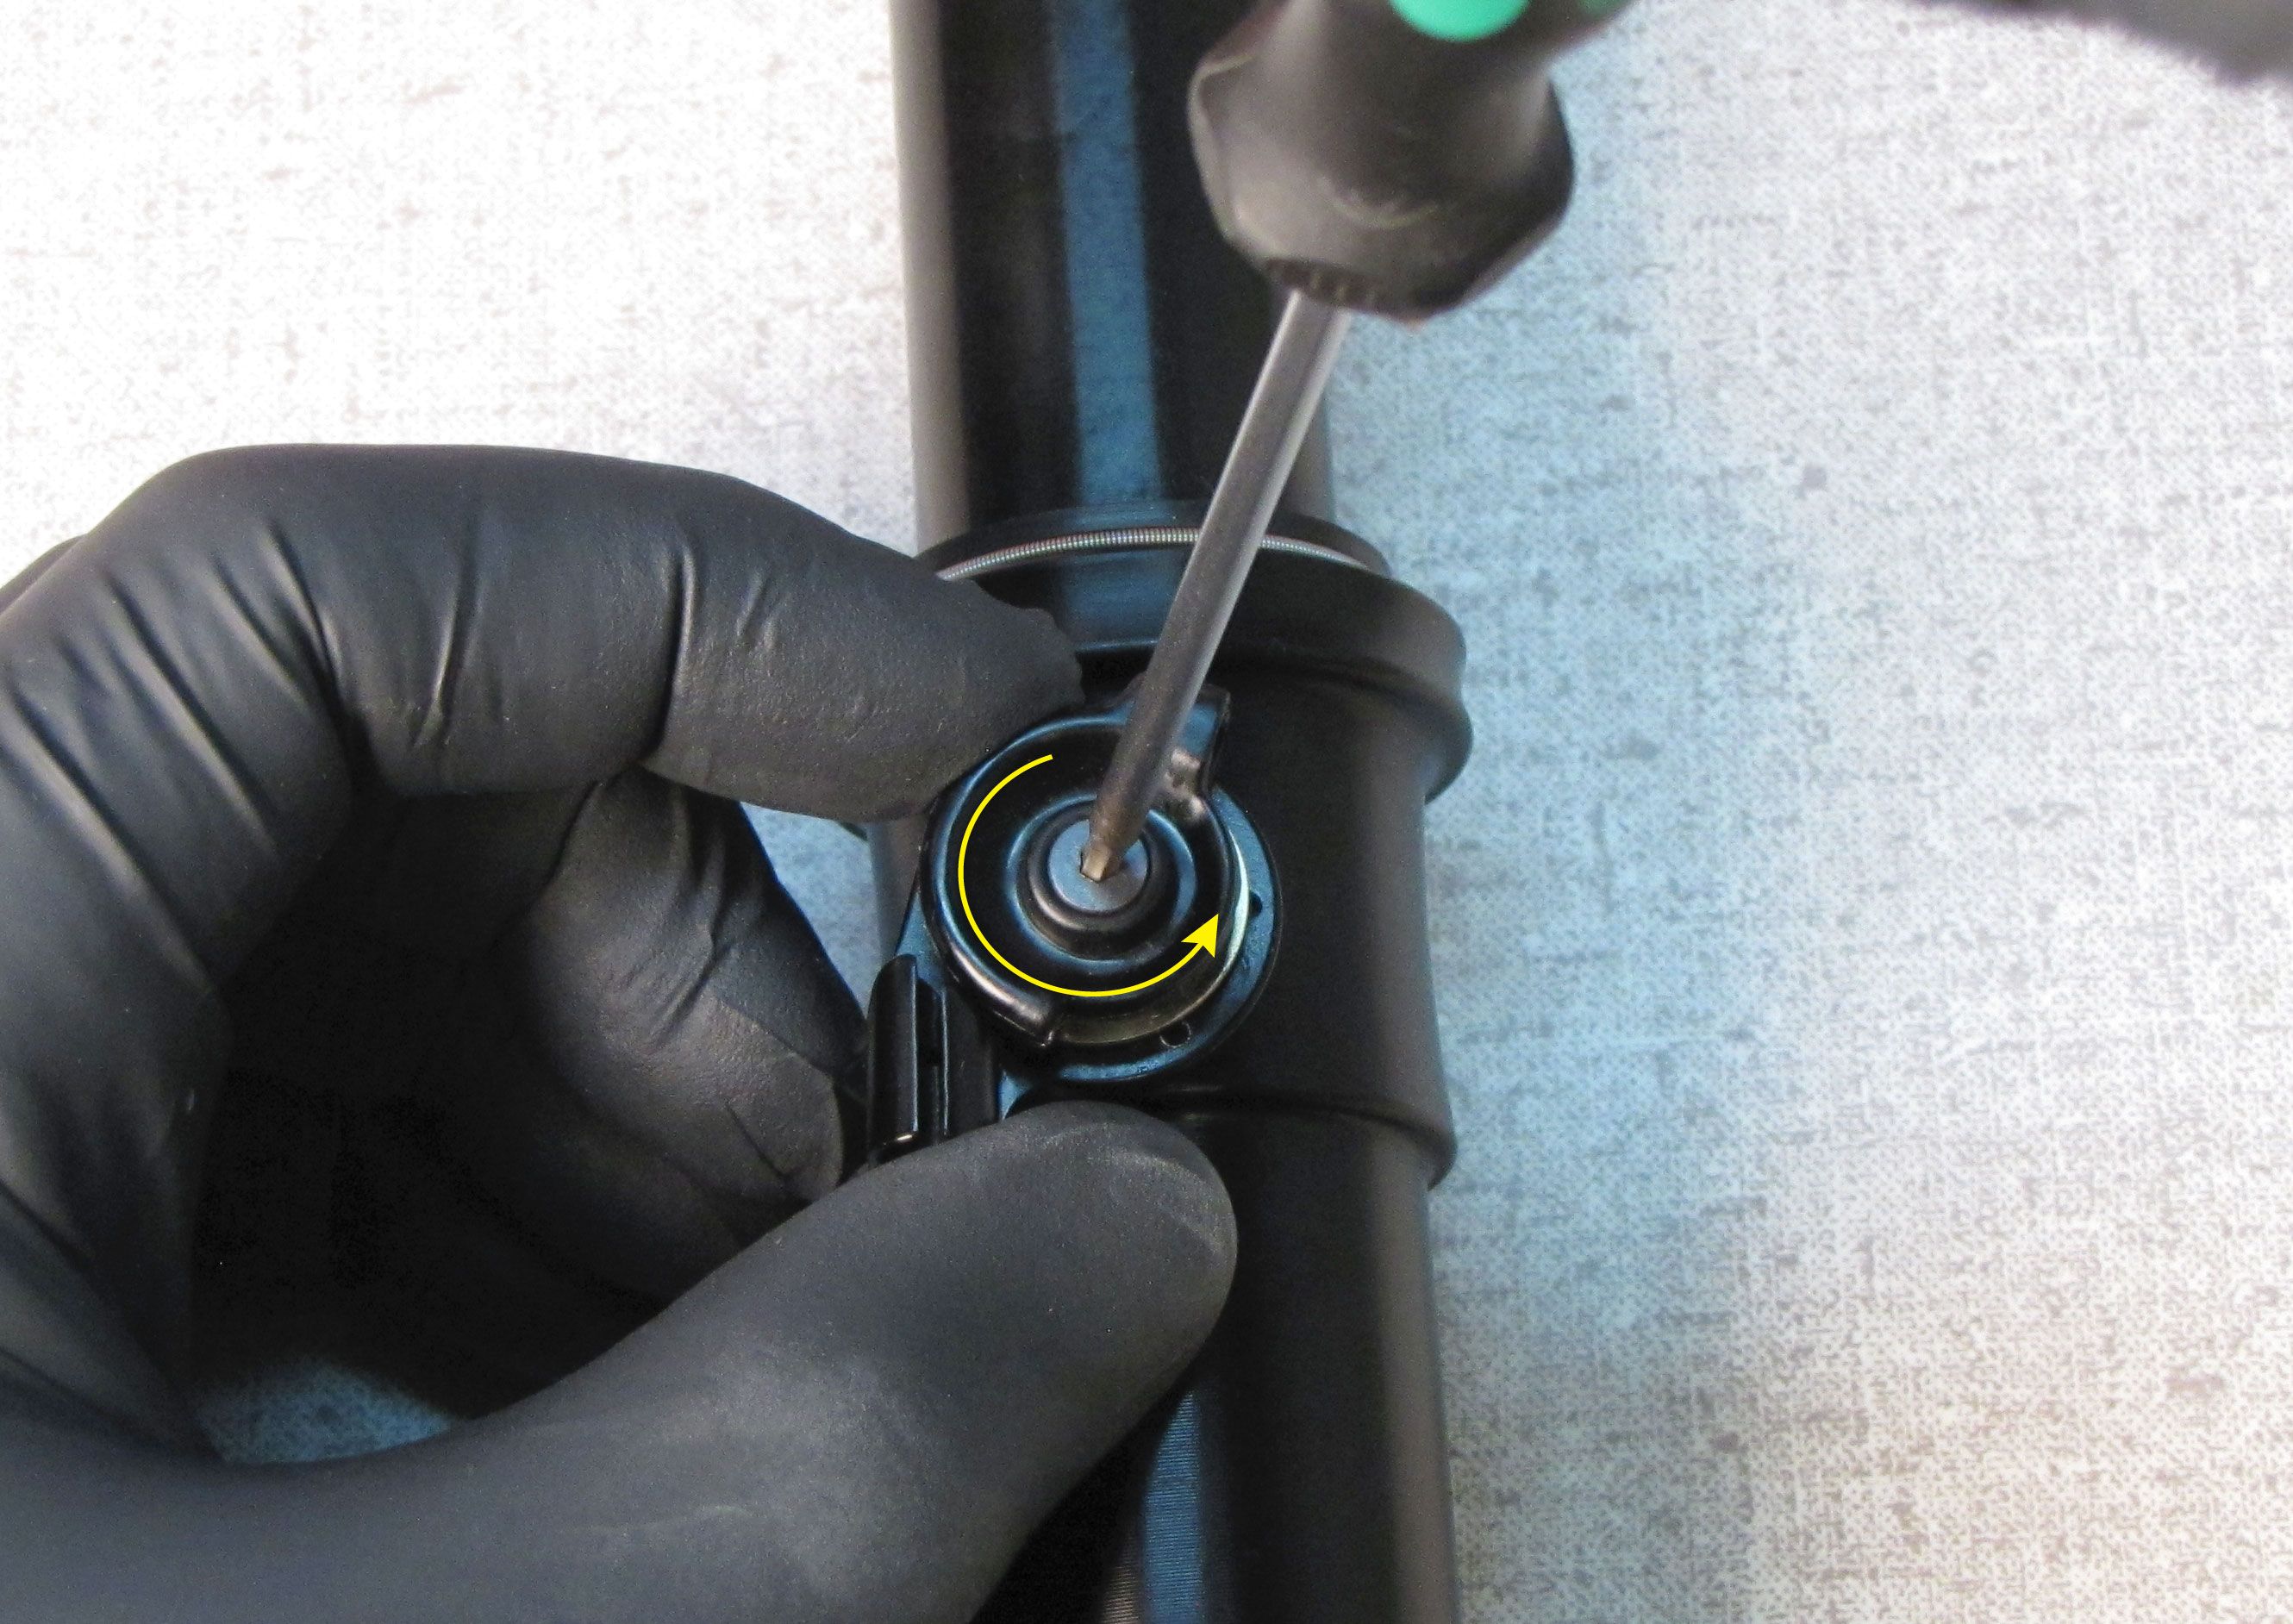
Step 3
Reinstall the retaining ring. Install the pulley so the silver pin at the seatpost adjuster inserts into the angled slot on the back of the pulley. The pulley can only be installed properly in this, its original orientation. The pulley does not need to be reoriented when reorienting the cable housing stop.
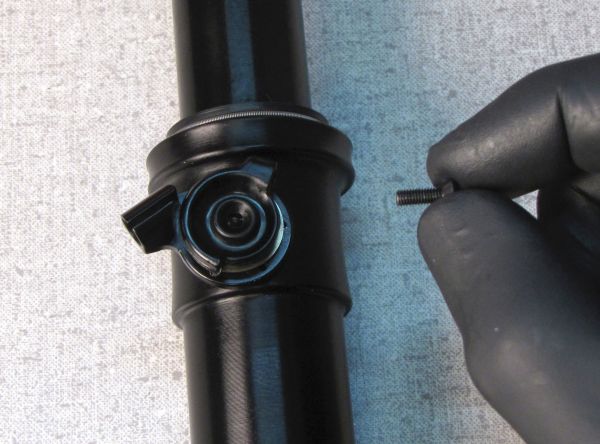
Step 4
Reinstall the set screw and tighten clockwise to 15 in-lb (1.7 Nm) torque with your 2mm hex wrench.

Service Intervals
To best maintain the performance and durability of your product under normal use, FOX recommends that you have regular Transfer Seatpost maintenance performed according to the service intervals listed below.
| Recommended Minimum Transfer Maintenance | Every Ride | Regularly | Every 125 Hours/Yearly, or whichever comes first.* |
| Clean exterior with mild soap and water only, then wipe dry with a soft towel. | X | ||
| Inspect your product for visual damage and function of all controls. | X | ||
| Full Transfer Seatpost service (Full rebuild) | X |
*For those who ride lift-accessed DH, Park, or Extreme Freeride or in extremely wet/muddy or dry/dusty environmental conditions where trail debris is sprayed onto the fork or shock while on the trail, FOX encourages riders to perform maintenance earlier than recommended above as needed. If you hear, see, or feel something unusual, stop riding immediately and contact a FOX Authorized Service Center for proper servicing.
Troubleshooting Guide
| Symptom | Possible Cause | Check, in this order: | If yes, then adjust this: |
| Creeps down when sitting on the post | Too much cable tension | Is there any freeplay in the lever (a.k.a. slack in the cable)? | Turn lever barrel adjuster to the point where the tip of the lever can freely move 2-5mm |
| Is something preventing your lever from returning freely or completely? | Check lever function, visually ensure no damage, fix/replace as needed. | ||
| Is your cable too short, or catching on something? Does the post only creep with the bars turned? | Fix/replace inner cable and housing as necessary | ||
| Is the cable pinched in the frame? If so- especially if the saddle height has been raised- the cable could be partially pulled. | Loosen the seat post clamp, lower the post in the frame ~10mm, re-clamp - is it still a problem? | ||
| Is the cable kinked or sharply bent in the frame? Does the post creep when removed from the bike? | Fix/replace inner cable and housing as necessary. Make sure you do not force the post into the frame as this can bend the cable (especially if there is a bend or other interruption inside the frame) | ||
| Slow to extend through entire stroke | Not enough cable tension (cable isn't being fully pulled) | Is the seatpost clamp gap aligned with the slot in the seattube? | Rotate clamp so that gap is 180 degrees from slot in seattube. |
| Does this only happen in cold temps, or after the post has been stored in the down position? | A slower return is to be expected in cold temps. Cycling the post up and down by hand several times can help warm things up. | ||
| Is there too much freeplay in the lever (a.k.a. slack in the cable)? | Turn lever barrel adjuster to the point where the tip of the lever can freely move 2-5mm | ||
| Is there a broken barrel adjuster on your lever (causing too much slack in the cable)? | Replace adjuster or lever as necessary | ||
| Is the seatpost clamp bolt too tight? Loosen it completely and check again. Does the post return better? | Clean post and frame seat tube with alcohol, apply friction paste to inside of frame and bottom of post. Tighten seatpost clamp to the minimum torque required to avoid the post slipping in the frame. Increase to the point at which you can start to feel a tight spot when moving the post up and down, and then back off 0.5 N-m. Do not torque above 5 N-m. | ||
| Is this fixed by re-lubricating the seal and bushings? | Try using a thin non-metallic zip tie (or similar) to lightly lift the wiper seal lip and add a drop of Float Fluid or similar oil. Do this at 2 places around the post, 180-deg opposite each other. On MY2021 and newer, you can also do this by unthreading the post collar, lubricating the upper post with Slick Honey, Slickoleum, or a similar grease, and then tightening the collar to 12 ft-lb torque. | ||
| Is the cable kinked or sharply bent in the frame? Is the post slow to return when removed from the bike? | Fix/replace inner cable and housing as necessary. Make sure you do not force the post into the frame as this can bend the cable (especially if there is a bend or other interruption inside the frame) | ||
| Check the post off the bike, with no cable attached, by pressing the lever on the bottom of the post with your thumb. Does it still return slowly? If not, re-check the items above. | If you've checked the items above, and the post isn't working properly when removed from the bike, please contact your local FOX Service Center to arrange for diagnosis and repair. In the USA and Canada, you can request a Return Authorization number directly at this link: https://www.ridefox.com/rarequest.php?m=bike. For riders in other countries, you can find your regional service center here: https://www.ridefox.com/contact.php?c=worldwide&type=bike&country= |
||
| Slow return at a only certain point in travel, or only at the end of the stroke, or you can feel a 'tight spot' when pushing the post down | Binding due to too much torque on seatpost clamp | Is the seatpost clamp gap aligned with the slot in the seattube? | Rotate clamp so that gap is 180 degrees from slot in seattube. |
| Does this only happen in cold temps, or after the post has been stored in the down position? | A slower return is to be expected in cold temps. Cycling the post up and down by hand several times can help warm things up. | ||
| Is the seatpost clamp bolt too tight? Loosen it completely and check again. Does the post return better? | Clean post and frame seat tube with alcohol, apply friction paste to inside of frame and bottom of post. Tighten seatpost clamp to the minimum torque required to avoid the post slipping in the frame. Increase to the point at which you can start to feel a tight spot when moving the post up and down, and then back off 0.5 N-m. Do not torque above 5 N-m. | ||
| Is this fixed by re-lubricating the seal and bushings? | Try using a thin non-metallic zip tie (or similar) to lightly lift the wiper seal lip and add a drop of Float Fluid or similar oil. Do this at 2 places around the post, 180-deg opposite each other. On MY2021 and newer, you can also do this by unthreading the post collar, lubricating the upper post with Slick Honey, Slickoleum, or a similar grease, and then tightening the collar to 12 ft-lb torque. | ||
| Check the post off the bike, with no cable attached, by pressing the lever on the bottom of the post with your thumb. Does it still return slowly? If not, re-check the items above. | If you've checked the items above, and the post isn't working properly when removed from the bike, please contact your local FOX Service Center to arrange for diagnosis and repair. In the USA and Canada, you can request a Return Authorization number directly at this link: https://www.ridefox.com/rarequest.php?m=bike. For riders in other countries, you can find your regional service center here: https://www.ridefox.com/contact.php?c=worldwide&type=bike&country= |
||