


|
|
|
|
|
Installing Your Shock | General Maintenance | Before You Ride | Measuring Sag | Setting Sag | Adjusting Rebound | ProPedal | Stuck Down Shock | Air Sleeve Maintenance | Service Intervals | Important Safety Information
|
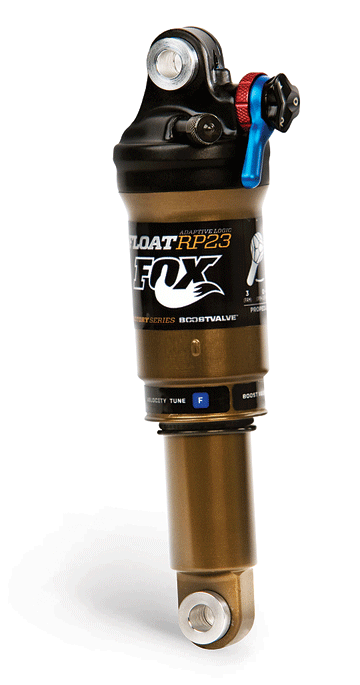
lengths & travels |
5.5 x 1.0; 6.0 x 1.25; 6.5 x 1.5; 7.5 x 2.0; 7.875 x 2.0; 7.875 x 2.25; 8.5 x 2.5 |
|
|
model features, adjustments |
|
||
|
spring |
air |
||
|
riding styles |
XC, trail, AM |
If you are installing your shock on a bike for which the shock is not original equipment:
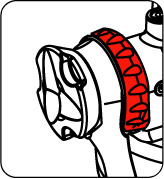
There may be a small amount of air sleeve lubricant residue on the body. This is normal. If this residual air sleeve lubricant is not present, this is an indication that the air sleeve should be re-lubricated. Some other things to consider for all shock models:
NOTE: Do not use any solvents or de-greasers, as these products can damage the shock's exterior finish or its anodized parts.
Do not spray water directly on the seal/shock body junction. Do not use a high pressure washer on your shock.
To set sag:
Shock Travel | 25 % Sag |
1.00/25.4 | 0.25/6.4 |
1.25/31.7 | 0.31/7.9 |
1.50/38.1 | 0.38/9.5 |
1.75/44.4 | 0.44/11.1 |
2.00/50.8 | 0.50/12.7 |
2.25/57.1 | 0.56/14.2 |
2.50/63.5 | 0.63/15.9 |
Rebound controls the rate at which your shock returns after it has been compressed. The proper rebound setting is a personal preference, and changes with rider weight, riding style and conditions. A rule of thumb is that rebound should be as fast as possible without kicking back and pushing the rider off the saddle.
The rebound knob has 12-15 clicks of adjustment.
For slower rebound, turn the red adjuster knob clockwise.
For faster rebound, turn the red adjuster knob counter-clockwise.
ProPedal® damping allows for on-the-fly pedaling platform adjustment, reducing pedal-induced suspension bob. ProPedal® damping levels are defined as follows:

|
= | "open". This level is essentially OFF; a zero level of low-speed damping, the most supple. |

|
= | "light": a minor level of low-speed damping; more sensitive than medium to small bumps. |

|
= | "medium": a moderate level of low-speed damping; less sensitive to small bumps. |

|
= | "firm": a higher level of low-speed damping; least sensitive to small bumps. This level is best for climbing, sprinting, or smooth road travel. |
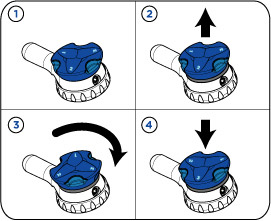
Use the following procedure to change your standard or Adaptive Logic™ RP23 ProPedal® knob setting.
CAUTION: For safety reasons, the ProPedal® knob setting should only be changed when you're not in motion on the bicycle.
|
|
Hold the ProPedal® lever down with one hand. |
|
|
With your other hand, pull the ProPedal® knob upwards. |
|
|
Holding the ProPedal® knob up, turn it clockwise (or counter-clockwise) until the selection you're choosing is aligned with the ProPedal® lever. The ProPedal® knob clicks twice per setting as it turns; the first click occurs as you exit the current setting, the second click as you engage the new setting. |

|
Push the ProPedal® knob down, to lock it into its new position. |
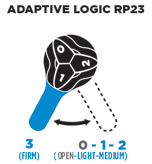
The original standard and the new adaptive logic for RP23 ProPedal® functionality are both driven by the presetting of your ProPedal® knob.
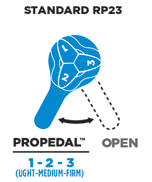
| ProPedal® Operation Logic Comparison | |
|
As shown in this standard ProPedal® knob setting example, you can toggle between a riding platform of medium firmness (#2), or the open setting for a smoother ride over rough terrain. By changing your knob setting to #1, #2, or #3, you can choose the light, medium, or firm pedaling platform. Switch from any of these preset platforms to the open platform by simply flipping your ProPedal® lever. |
|
As shown in this Adaptive Logic™ ProPedal® knob setting example, you can toggle between the firmest riding platform (#3), or the light setting (#1). By changing your knob setting between #0, #1, or #2, you can choose to have open, light, or medium. By flipping your ProPedal® lever, switch from any of these preset platforms to the firm platform (#3). |
|
|
|
Bushing Technology & Inspection | Control Direction | Oil Volumes | Structural Inspection | Dropout Thickness Inspection | Torque Values | Unit Conversion | Suspension Tuning Tips | Using the Pump | Important Safety Information | Service Intervals | Contact FOX Service | Warranty Information | FOXHelp Service Web Site
Copyright © 2011
FOX Factory Inc.
