


|
|
|
|
|
Installing Your Fork | Before You Ride | Setting Fork Air Pressure | Adjusting Rebound | Climb. Trail. Descend. | Adjusting Trail Mode | Adjusting Fork Travel | Service Intervals | Important Safety Information
|
travel |
(Internally adjustable to 110 or 120 mm) |
|
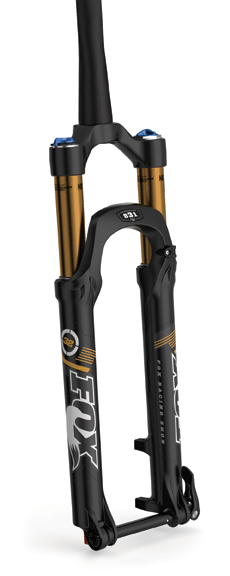
model features, adjustments |
Factory FIT CTD with Trail Adjust: Kashima coated or hard anodized upper tubes, 1.5" tapered or 1 1/8" steerer, lever actuated 3-position Climb/Trail/Descend, 3-position Trail Adjust, air spring pressure, rebound |
|
|
lower leg options |
|
|
|
spring |
air |
|
|
riding styles |
4X, dirt jump |
Be sure your fork is properly installed before proceeding. If your fork came pre-installed on your bicycle, continue to the next section.
NOTE: Do not use any solvents or de-greasers, as these products can cause serious damage to paint and anodized parts (upper tubes, knobs, steerers).
Do not spray water directly on the seal/upper tube junction. Do not use a high pressure washer on your fork.
To get the best performance from your fork, occasionally it is necessary to readjust fork air pressure.
NOTE: Setting sag is desired and necessary for proper fork performance during general XC/Trail riding. The 831 fork is not intended for general XC/Trail riding use, but for four cross racing, slalom, or dirt jumping. Therefore, the air pressure is generally not set by obtaining proper sag, but is intended more for proper riding feel and bottom out control. The 831 fork comes with a pressure setting of 100 psi from the FOX Factory.
Symptom | Remedy |
Excessive bottoming | (+) air pressure in 5 psi increments |
Harsh ride; full travel not utilized | (-) air pressure in 5 psi increments |
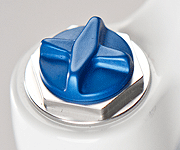
The red rebound adjuster knob is located at the bottom of the right fork leg.
Rebound controls the rate of speed at which the fork extends after compressing. Turning the knob clockwise (in) slows down rebound; turning the knob counter-clockwise (out) speeds up rebound. As a starting point, turn the rebound adjuster knob all the way clockwise (full in) until it stops, then turn counter-clockwise (out) 6 clicks.
|
Knob Setting |
Setting Description |
Tuning Tips |
Setup Tips |
|
|
Slow Rebound |
Too slow and your fork will pack down and ride harshly. |
If you increase your spring rate or air pressure, you will need to slow down your rebound |
|
6 (Factory setting) |
Average Rebound |
|
|
|
|
Fast Rebound |
Too fast and you will experience poor traction and wheel hop. |
If you decrease your spring rate or air pressure, you will need to speed up your rebound setting. |
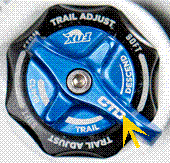
The blue CTD lever lets you to switch between the Climb, Trail, and Descend ride modes. Each mode is most suitable for each specific type of terrain, providing best performance and riding enjoyment with your fork. With some experience, you can experiment with using Trail mode when descending, or Descend mode for flat or undulating trails.
NOTE: With full CTD suspension, front to rear suspension balance is best achieved by running the fork in the same ride mode as the rear shock (Climb with Climb, Trail with Trail, Descend with Descend).
Rotate the CTD lever fully clockwise to set the fork in Climb mode, which is most useful for climbing and sprinting. In Climb mode, the fork will "blow off" in the event that a big hit is encountered. This setting was formerly known as “lockout.”
There are two pre-set Climb Tune mode settings offered for Factory and Performance model forks: medium and firm.
Refer to the Climb Tune decal located on the crown next to the CTD lever, to determine which factory pre-set climb tune your fork has:

|
Medium factory settings will be found on longer travel forks (130 mm travel and above for 26 forks, and 120 mm travel and above, for 29 forks) |

|
Firm factory settings will be found on shorter travel XC-type forks |
Climb Tune factory settings can only be altered through complete disassembly and re-bleeding of the CTD damper system. Contact your local dealer or FOX at 1-800-FOX-SHOX for more information. Additional service information can be viewed at http://service.ridefox.com.
NOTE: The fork may cycle a couple of times after you engage Climb mode. Once complete Climb mode is achieved, the fork may continue to move 3 - 5 mm. This is normal, and does not affect performance.
Rotate the lever to the middle setting of the blue CTD lever to engage Trail mode. Trail mode offers significantly less compression damping than climb mode, which is good for a light pedaling platform when pumping undulating terrain, and for preventing excessive travel in technical riding situations (such as low-speed drops).
Rotate the lever fully counter-clockwise to set the fork in Descend mode, which is similar to Trail mode but with significantly less low-speed compression damping for the most resilient ride when descending.
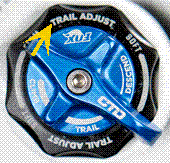
Factory FIT CTD Trail Adjust model forks feature a three-position Trail Adjust control that regulates low-speed compression damping only while you are in Trail mode.
NOTE: While it is possible to readjust FIT CTD Trail Adjust when you are in either Climb or Descend mode, Trail Adjust changes will only be felt in Trail mode.
For a firmer low-speed compression setting in Trail mode, turn the black Trail Adjust dial clockwise. For a lighter setting, turn the Trail Adjust dial counter-clockwise.
TIP: This setting is designed to work in conjunction with the rear shock, keeping in mind that front to rear suspension balance works best when the fork is in the same ride mode as the rear shock.
|
Knob Setting |
Setting Description |
Tuning Tips |
Setup Tips |
|
|
Firm Compression |
Too firm and you will experience poor traction and wheel hop. |
Resists brake dive and keeps the fork up in the travel. Too firm and you may have poor traction in loose conditions. |
|
3 |
|
|
|
|
|
Soft Compression |
Too soft and your fork will pack down and ride harsh. |
Maximum wheel traction and bump compliance. Too soft and you may have excessive brake dive and a wallowy feel. |
Travel on your 831 RLC fork can be changed by rearranging the internal travel spacers. After changing travel, check the fork for proper operation before riding. If there is noticeable play in the fork or if it makes strange sounds, disassemble the fork and check for the complete number and correct orientation of spacers.
NOTE: The 831 fork comes from the factory preset to 100 mm of travel. The fork travel can be increased to 110 mm or 120 mm, but it cannot be increased beyond 120 mm.
|
Quantity |
Part Number |
Part Name |
|
1 |
025-02-003 |
1 qt. bottle of FOX Suspension Fluid (10 wt.) |
|
1 |
025-03-002-A |
5 cc Pillow Pack of FOX FLOAT Fluid |
|
2 |
241-01-002-C |
Crush washer |
|
1 |
803-00-078 |
32 mm Cartridge Seal Kit (optional) |
CAUTION: With the model year 2010 and newer 831 fork, it is absolutely essential that the air spring assembly be removed and installed via the bottom end of the upper tube. Your failure to do so will most likely cause damage to the air piston seal.
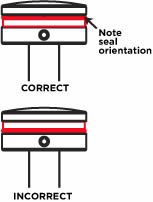
NOTE: The groove around the inside edge of the plate must be facing the inside of the leg when it is installed.
NOTE: Spacers snap onto the air shaft in between the negative spring guide and the topout plate.

|
|
|
Bushing Technology & Inspection | Control Direction | Oil Volumes | Structural Inspection | Dropout Thickness Inspection | Torque Values | Unit Conversion | Suspension Tuning Tips | Using the Pump | Important Safety Information | Service Intervals | Contact FOX Service | Warranty Information | FOXHelp Service Web Site
Copyright © 2012
FOX Factory Inc.