


|
|
|
|
|
Installing Your Shock | General Maintenance | Before You Ride | Setting Sag | Changing Springs | Measuring Sag | Adjusting Rebound | Service Intervals | Important Safety Information
|
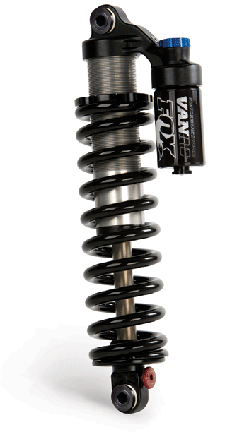
lengths & travels |
7.5 x 2.0; 7.875 x 2.0; 7.875 x 2.25; 8.5 x 2.5; 8.75 x 2.75; 9.5 x 3.0; 10.5 x 3.5 |
|
| \
model features, adjustments |
|
||
|
spring |
coil |
||
|
riding styles |
AM, FR, DH |
If you are installing your shock on a bike for which the shock is not original equipment:
Some things to consider:
NOTE: Do not use any solvents or de-greasers, as these products can damage the shock's exterior finish or its anodized parts.
Do not spray water directly on the seal/shock body junction. Do not use a high pressure washer on your shock.
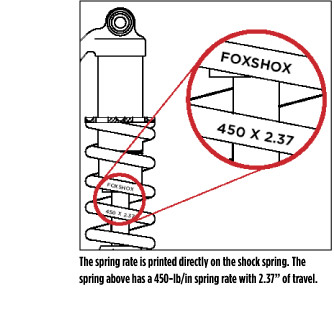
If your sag value is less than the table value, turn the preload ring counter-clockwise. Always ensure that the spring is secure and does not freely move.
NOTE: After the preload ring engages the spring, turn the preload ring clockwise one turn. If the preload ring needs to be turned counter-clockwise from this point to achieve proper sag, you will need to obtain a lower rate spring.
If your sag value is greater than the table value, turn the preload ring clockwise no more than two full turns after the preload ring engages the spring.
NOTE: If after the preload ring engages the spring and more than two full clockwise turns are needed to achieve proper sag, you will need to obtain a higher rate spring.
Shock Travel | Recommended Sag |
2.00/50.8 | 0.66/16.76 |
2.25/57.1 | 0.74/18.79 |
2.50/63.5 | 0.83/21.08 |
2.75/69.8 | 0.91/23.11 |
3.00/76.2 | 1.00/25.40 |
3.50/88.9 | 1.16/29.46 |
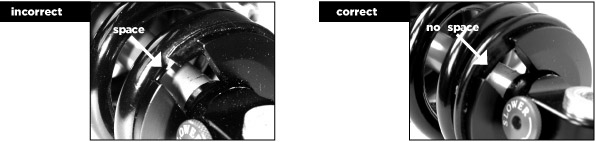
When placing the spring back on the shock body, it is important that the spring is correctly oriented. Essentially, the space in the spring retainer should rest on the flat part of the spring, and not on the segment of the spring where it starts to coil back under itself. Rotate the spring or spring retainer until the correct orientation is achieved.
WARNING: An improperly oriented spring can fail prematurely, causing loss of control of the bicycle, which can result in SERIOUS INJURY OR DEATH.
The pictures below demonstrate correct and incorrect spring orientation. Correct spring orientation applies to all FOX Racing Shox rear shocks that utilize coil springs:
Rebound controls the rate at which your shock returns after it has been compressed. The proper rebound setting is a personal preference, and changes with rider weight, riding style and conditions. A rule of thumb is that rebound should be as fast as possible without kicking back and pushing the rider off the saddle.
The rebound knob has approximately 15 clicks of adjustment.
For slower rebound, turn the red adjuster knob clockwise.
For faster rebound, turn the red adjuster knob counter-clockwise.
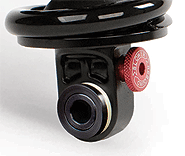
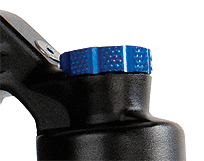
Turn the blue LSC adjust knob clockwise to increase, counter-clockwise to decrease low-speed compression damping. The LSC adjust knob primarily affects the compression damping during slow speed suspension movements, such as g-outs or smooth jump landings. It also affects wheel traction and the harshness or plushness feel of your bicycle. The LSC adjust knob has ~16 clicks of adjustment range.
|
|
|
Bushing Technology & Inspection | Control Direction | Oil Volumes | Structural Inspection | Dropout Thickness Inspection | Torque Values | Unit Conversion | Suspension Tuning Tips | Using the Pump | Important Safety Information | Service Intervals | Contact FOX Service | Warranty Information | FOXHelp Service Web Site
Copyright © 2012
FOX Factory Inc.