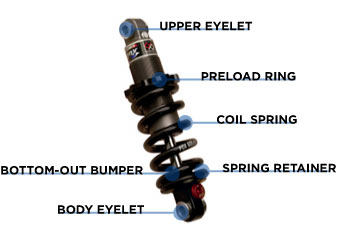


VANILLA REAR SHOCK
Installing Your Shock | General Maintenance | Before You Ride | Setting Sag | Changing Springs | Measuring Sag | Service Intervals | Important Safety Information
|
|
weight |
0.41 lbs./184 g |
|
features/adjustments |
coil spring preload Initial force placed on an air or coil spring., speed-sensitive compression damping | |
|
spring |
coil | |
|
intended use |
freeride A style of riding that is defined by short course technical acrobatics and athletes that defy gravity. Generally, the bikes and components required for freeriding are stronger and heavier than their lightweight cross-country brethren. Combine the aerial pyrotechnics of freeriding with some longer trails and courses, as is typical of cross-country riding, and now you're looking at all-mountain riding., all-mountain A style of bicycle riding that melds the stamina and conditioning required of cross-country with the technical abilities of freeriding., cross-country A style of bicycle riding that is defined by long rides, lightweight bicycles and stamina. |
If you are installing your shock on a bike in which the shock is not original equipment:
Install the shock with the spring retainer, but without the spring. (To remove the spring, read Changing Springs.)
Carefully cycle the suspension through its entire travel.
Check that all parts of the shock are clear of the frame and swingarm as it cycles through the travel.
Properly place the spring back onto the shock.
Some things to consider:
If you ride in extreme conditions, service your shock more frequently. Check the maintenance schedule for your shock.
Wash your shock with soap and water only.
Do not use a high pressure washer to clean your shock.
Internal service should be performed by FOX Racing Shox or an Authorized Service Center.
Clean the outside of your shock with soap and water and wipe dry with a soft dry rag. Do not use a high pressure washer on your shock.
Inspect entire exterior of shock for damage. The shock should not be used if any of the exterior parts appear to be damaged. Please contact your local dealer or FOX Racing Shox for further inspection and repair.
Check that quick-release levers (or thru-axle pinch bolts) are properly adjusted and tightened.
Check headset adjustment. Adjust headset if loose, according to manufacturer’s recommendations.
Check that brake cables or hoses are properly fastened.
Check that the front and rear brakes operate properly on flat land.
You can also view a Flash video on Setting Sag.
To set sag on your VANILLA:
Measure sag, and compare it to the recommended sag setting shown in the Coil Spring Setting Guidelines table below. Continue if the sag is not to specification.
Adjust the preload ring accordingly:
If sag is lower than on the table, turn the preload ring counterclockwise. Always ensure that the spring is secure and does not freely move.
After the preload ring engages the spring, turn the preload ring clockwise A motion that proceeds from the top to the right, then down and then to the left, and back to the top, like the clock's hands. one turn. If the preload ring needs to be turned counterclockwise from this point to achieve proper sag, you will need to obtain a lower rate spring.
If sag is higher than on the table, turn the preload ring clockwise no more than full two turns after the preload ring engages the spring.
If after the preload ring engages the spring and more than two full clockwise turns are needed to achieve proper sag, you will need to obtain a higher rate spring.
If necessary, contact FOX Racing Shox or an Authorized Service Center to obtain a higher- or lower-rated spring.
|
Shock Travel |
Recommended Sag |
|
1.5038.1 |
.38/9.5 |
|
2.00/50.8 |
.50/12.7 |
Loosen the preload ring until the spring freely moves.
Lift up the spring and remove the spring retainer.
Slide the spring off the shock body. Depending on your bike model, you may need to remove the reducers to remove the spring.
Orient the new spring correctly (see Spring Orientation below) and slide it onto the shock body.
Place the spring retainer back on the shock and under the spring ensuring that the open slot on the spring retainer rests on the flat part of the spring end.
Tighten the preload ring just until the spring no longer moves.
Turn the preload ring one additional full turn.
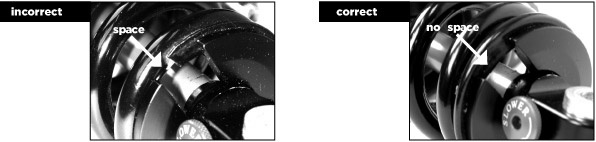
When placing the spring back on the shock body, it is important that the spring is correctly oriented. Essentially, the space in the spring retainer should rest on the flat part of the spring, and not on the segment of the spring where it starts to coil back under itself. Rotate the spring or spring retainer until the correct orientation is achieved.
An improperly oriented spring can fail prematurely, causing loss of control of the bicycle, which can result in serious or fatal injuries. The pictures below demonstrate correct and incorrect spring orientation. Correct spring orientation applies to all FOX Racing Shox rear shocks that utilize coil springs:
eng051

![]()
Bushing Technology & Inspection | Seals & Foam Rings | Control Direction | Oil Volumes | Structural Inspection | Dropout Thickness Inspection | Torque Values | Unit Conversion | Suspension Tuning Tips | Using the Pump | Important Safety Information | Service Intervals | Distributors & Global Service Centers | Contact FOX | Warranty Information