weight
0.47 lbs./213 g
(6.50" x 1.50" No reducers)
features/adjustments
lightweight chassis, DOHC
spring
air
intended use
Installing Your Shock | General Maintenance | Before You Ride | Measuring Sag | Setting Sag | Adjusting Rebound | Adjusting Compression | Service Intervals | Important Safety Information | Stuck Down Shock | Air Sleeve Maintenance
If you are installing your shock on a bike in which the shock is not original equipment:
There may be a small amount of air sleeve lubricant residue on the body. This is normal. If this residual air sleeve lubricant is not present, this is an indication that the air sleeve should be re-lubricated. Some other things to consider for all shock models:
To get the best performance from your FLOAT RPL shock,
it is necessary to set
|
Rider Weight lbs. (kg) |
Main Air Chamber Pressure PSI |
|
90 - 100 (41 - 45) |
95 - 100 |
|
110 - 110 (45 - 50) |
100 - 110 |
|
110 - 120 (50 - 54) |
110 - 120 |
|
120 - 130 (54 - 60) |
120 - 125 |
|
130 - 140 (60 - 64) |
125 - 130 |
|
140 - 150 (64 - 68) |
130 - 135 |
|
150 - 160 (68 - 73) |
135 - 140 |
|
160 - 170 (73 - 77) |
140 - 150 |
|
170 - 180 (77 - 82) |
150 - 160 |
|
180 - 190 (82 - 86) |
160 - 170 |
|
190 - 200 (86 - 91) |
170 - 180 |
|
200 - 210 (91 - 95) |
180 - 190 |
|
210 - 220 (95 - 100) |
190 - 200 |
|
220 - 230 (100 - 104) |
200 - 210 |
|
230 - 240 (104 - 109) |
210 - 220 |
|
240 - 250 (109 - 113) |
220 - 230 |
|
250 - 265 (113 - 120) |
230 - 240 |
|
265 - 280 (120 - 127) |
240 - 250 |
|
280 - 295 (127 - 134) |
250 - 260 |
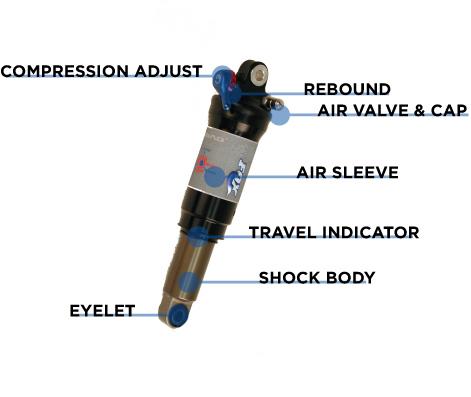
Rebound controls the rate at which your shock returns after it has been compressed. The proper rebound setting is a personal preference, and changes with rider weight, riding style and conditions. A rule of thumb is that rebound should be as fast as possible without kicking back and pushing the rider off the saddle.
The rebound knob has 8-10 clicks of adjustment.
For slower rebound, turn the red adjuster knob clockwise.
For faster rebound, turn the red adjuster knob counterclockwise.

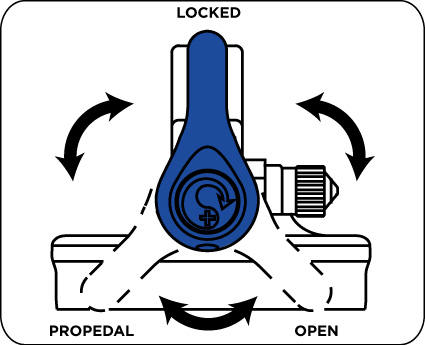
Some bicycles feature a FOX Racing Shox FLOAT RPL shock. The FLOAT RPL has three on-the-fly suspension settings:
1. OPEN (DESCENDING)
2. PROPEDAL (FOR BUMP COMPLIANCE AND PEDALING EFFICIENCY)
3. LOCKED (CLIMBING & ROAD RIDING)
Use the different settings to tune the shock to different riding conditions and situations. For example, use the PROPEDAL or LOCKED position for riding to the top of the mountain, and then switch to the OPEN position for the descent. Because suspension designs and riding skills vary, optimal settings can vary from bike to bike and rider to rider.
To determine which compression adjust position is best, pedal the bicycle at about 15 MPH and monitor the shock movement. Switch between positions and select the one that reduces suspension movement most effectively while providing the desired amount of bump absorption. The setting may change depending on conditions and riding styles.
eng075