![]()
![]()
![]()
![]()
![]()
![]()
![]()
![]()
Installing Your Shock | General Maintenance | Before You Ride | Measuring Sag | Setting Sag | Adjusting Rebound | ProPedal| Boost Valve | Service Intervals | Important Safety Information | Stuck Down Shock | Air Sleeve Maintenance | DHX Air Explained
If you are installing your shock on a bike in which the shock is not original equipment:
There may be a small amount of air sleeve lubricant residue on the body. This is normal. If this residual air sleeve lubricant is not present, this is an indication that the air sleeve should be re-lubricated. Some other things to consider for all shock models:
You can also view a Flash video on Setting Sag.
To set sag on your DHX Air 3.0:
|
Shock Travel |
Recommended Sag |
|
2.00/50.8 |
.50/12.7 |
|
2.25/57.2 |
.56/14.2 |
|
2.50/63.5 |
.62/15.7 |
|
3.00/76.2 |
.75/19.0 |
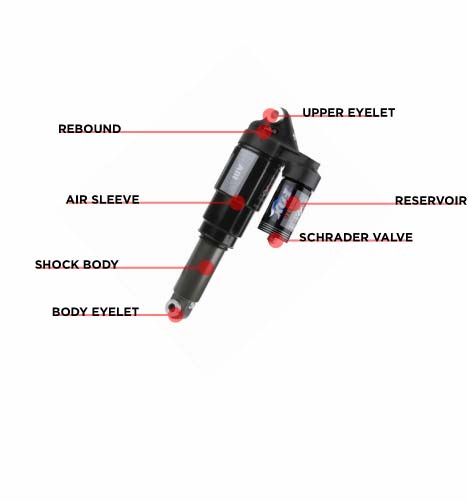
Rebound controls the rate at which your shock returns after it has been compressed. The proper rebound setting is a personal preference, and changes with rider weight, riding style and conditions. A rule of thumb is that rebound should be as fast as possible without kicking back and pushing the rider off the saddle.
The rebound dial has approximately 22 clicks of adjustment.
For slower rebound, turn the red adjuster knob clockwise.
For faster rebound, turn the red adjuster knob counterclockwise.
The ProPedal on your DHX Air 3.0 is set at the factory, and cannot be adjusted.
The Boost Valve creates a position-sensitive damping scheme that allows
for a seamless transition from efficient ProPedal to square-edge bump
absorption to a bottomless end-of-stroke feel. The Boost Valve also decouples
the factory-set ProPedal and factory-set bottom-out resistance without
affecting the
The Boost Valve is not adjusted directly. Instead, its behavior and performance characteristics are influenced by the air pressure setting in the reservoir.
To change the compression damping characteristics of your DHX Air 3.0 shock, attach a FOX High Pressure Pump to the air valve on the reservoir:
For a firmer ride, add 10 - 15 pounds of air pressure (to a maximum of 200 PSI).
For a softer ride, decrease the shock's air pressure 10 - 15 pounds by using the pump's bleed valve (to a minimum of 125 PSI).
Ride your bike and verify the settings before repeating the procedure.
Never ride your bike with more than 200 PSI or less than
125 PSI in the reservoir air chamber.
Doing so can damage your shock and require repairs that are NOT covered
under warranty.
eng047
![]()
![]()
Bushing Technology & Inspection | Seals & Foam Rings | Seal Cleaning | Control Direction | Oil Volumes | Structural Inspection | Dropout Thickness Inspection | Torque Values| Unit Conversion | Suspension Tuning Tips | Using the Pump | Important Safety Information | Service Intervals | Contact FOX Service | Warranty Information