Browse the rest of the FOX Racing Shox catalog Shows contact information for FOX Racing Shox Prints the contents of this frame only How-to on navigating FOXHelp

FLOAT REAR SHOCK

Installing Your Shock  |  General Maintenance  |  Before You Ride  |  Measuring Sag  |  Setting Sag  |  Service Intervals  |  Important Safety Information  |  Stuck Down Shock  |  Air Sleeve Maintenance

weight

0.44 lbs./200 g
(6.50" x 1.50" No reducers)

features/adjustments

high volume standard air sleeve, lightweight chassis, air spring pressure

spring

air

intended use

all-mountain, cross-country

Installing Your Shock

If you are installing your shock on a bike in which the shock is not original equipment:

  1. Install the shock.
  2. Remove the main air chamber air cap and let all the air out of the main air chamber.
  3. Carefully cycle the suspension through its entire travel.
  4. Check that all parts of the shock are clear of the frame and swingarm as it cycles through the travel.
  5. Pressurize your main air chamber to a minimum of 50 psi and no more than 300 psi. You will tune to a more specific air pressure in the Setting Sag section below.
  6. Set sag.

General Maintenance

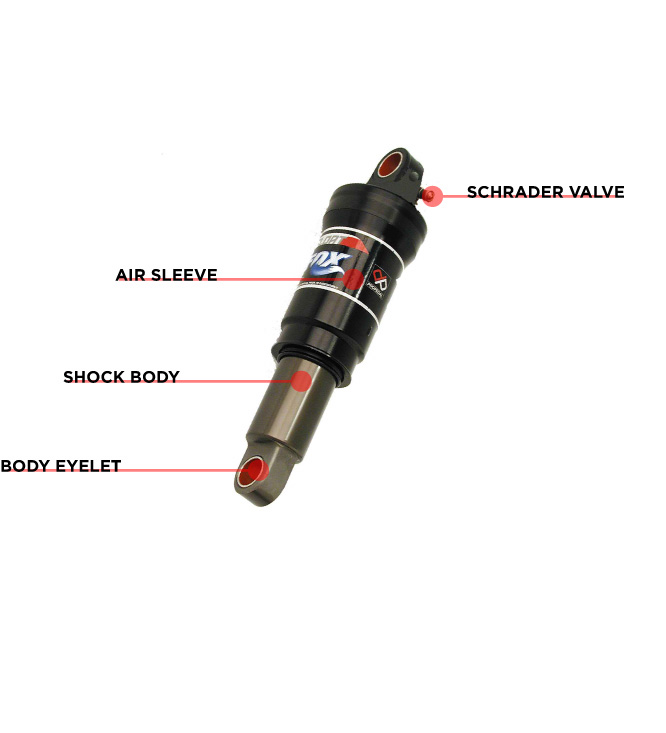
There may be a small amount of air sleeve lubricant residue on the body. This is normal. If this residual air sleeve lubricant is not present, this is an indication that the air sleeve should be re-lubricated. Some other things to consider for all shock models:

Before You Ride

  1. Clean the outside of your shock with soap and water and wipe dry with a soft dry rag. Do not use a high pressure washer on your shock.
  2. Inspect entire exterior of shock for damage. The shock should not be used if any of the exterior parts appear to be damaged. Please contact your local dealer or FOX Racing Shox for further inspection and repair.
  3. Check that quick-release levers (or thru-axle pinch bolts) are properly adjusted and tightened.
  4. Check headset adjustment. If loose, adjust according to manufacturer’s recommendations.
  5. Check that brake cables or hoses are properly fastened.
  6. Check that the front and rear brakes operate properly on flat land.

Setting Sag

You can also view a Flash video on Setting Sag.

To set sag:

  1. Measure sag, and compare it to the recommended sag setting shown in the Air Spring Setting Guidelines table below. Continue if the sag is not to specification.
  2. Locate the Schrader air valve on the shock and remove the air valve cap.
  3. Screw the FOX Racing Shox High Pressure Pump onto the air valve until the pump shows pressure on the gauge. Do not over-tighten.
  4. Add air pressure until desired pressure is shown on the gauge. Refer to the Air Spring Setting Guidelines table below for the proper sag setting.
  5. Unthread the pump from the air valve and measure sag.
  6. Repeat steps 2-5 until proper sag is achieved, then replace the air valve cap.

AIR SPRING SETTING guidelines

Shock Travel
(in./mm)

Sag
(in./mm)

1.50/38.1

.38/9.5

2.00/50.8

.50/12.7

eng053

WHEREVER YOU RIDE. WHEREVER YOU RIDE.


Bushing Technology & Inspection | Seals & Foam Rings | Seal Cleaning | Control Direction | Oil Volumes | Structural Inspection | Dropout Thickness Inspection | Torque ValuesUnit Conversion | Suspension Tuning Tips | Using the Pump |  Important Safety Information | Service Intervals | Contact FOX Service | Warranty Information