Browse the rest of the FOX Racing Shox catalog Shows contact information for FOX Racing Shox Prints the contents of this frame only How-to on navigating FOXHelp

Vanilla REAR SHOCK

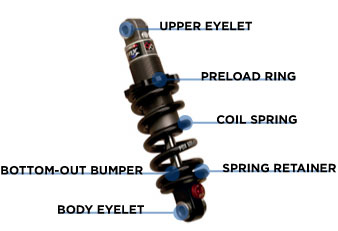
Installing Your Shock  |  General Maintenance  |  Before You Ride  |  Setting Sag  |  Changing Springs  |  Measuring Sag  |  Service Intervals  |  Important Safety Information

weight

0.41 lbs./184 g
(6.5" x 1.5" No reducers or spring)

features/adjustments

coil spring preload, speed-sensitive compression damping

spring

coil

intended use

freeride, all-mountain, cross-country

Installing Your Shock

If you are installing your shock on a bike in which the shock is not original equipment:

  1. Install the shock with the spring retainer, but without the spring. (To remove the spring, read Changing Springs.)
  2. Carefully cycle the suspension through its entire travel.
  3. Check that all parts of the shock are clear of the frame and swingarm as it cycles through the travel.
  4. Properly place the spring back onto the shock.
  5. Set sag.

General Maintenance

Some things to consider:

Before You Ride

  1. Clean the outside of your shock with soap and water and wipe dry with a soft dry rag. Do not use a high pressure washer on your shock.
  2. Inspect entire exterior of shock for damage. The shock should not be used if any of the exterior parts appear to be damaged. Please contact your local dealer or FOX Racing Shox for further inspection and repair.
  3. Check that quick-release levers (or thru-axle pinch bolts) are properly adjusted and tightened.
  4. Check headset adjustment. Adjust headset if loose, according to manufacturer’s recommendations.
  5. Check that brake cables or hoses are properly fastened.
  6. Check that the front and rear brakes operate properly on flat land.

Setting Sag

You can also view a Flash video on Setting Sag.

To set sag on your VANILLA:

  1. Measure sag, and compare it to the recommended sag setting shown in the Coil Spring Setting Guidelines table below. Continue if the sag is not to specification.
  2. Adjust the preload ring accordingly:

    If sag is lower than on the table, turn the preload ring counterclockwise. Always ensure that the spring is secure and does not freely move.

    After the preload ring engages the spring, turn the preload ring clockwise one turn. If the preload ring needs to be turned counterclockwise from this point to achieve proper sag, you will need to obtain a lower rate spring.

    If sag is higher than on the table, turn the preload ring clockwise no more than full two turns after the preload ring engages the spring.

    If after the preload ring engages the spring and more than two full clockwise turns are needed to achieve proper sag, you will need to obtain a higher rate spring.

  3. If necessary, contact FOX Racing Shox or an Authorized Service Center to obtain a higher- or lower-rated spring.

coil SPRING SETTING guidelines

Shock Travel
(in./mm)

Recommended Sag
(in./mm)

1.5038.1

.38/9.5

2.00/50.8

.50/12.7

Changing Springs

  1. Loosen the preload ring until the spring freely moves.
  2. Lift up the spring and remove the spring retainer.
  3. Slide the spring off the shock body. Depending on your bike model, you may need to remove the reducers to remove the spring.
  4. Orient the new spring correctly (see Spring Orientation below) and slide it onto the shock body.
  5. Place the spring retainer back on the shock and under the spring ensuring that the open slot on the spring retainer rests on the flat part of the spring end.
  6. Tighten the preload ring just until the spring no longer moves.
  7. Turn the preload ring one additional full turn.

Spring Orientation

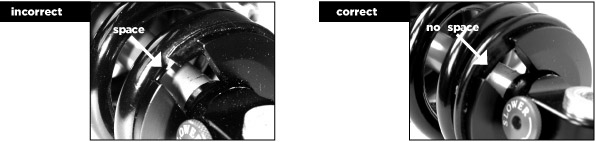
When placing the spring back on the shock body, it is important that the spring is correctly oriented. Essentially, the space in the spring retainer should rest on the flat part of the spring, and not on the segment of the spring where it starts to coil back under itself. Rotate the spring or spring retainer until the correct orientation is achieved.

An improperly oriented spring can fail prematurely, causing loss of control of the bicycle, which can result in serious or fatal injuries. The pictures below demonstrate correct and incorrect spring orientation. Correct spring orientation applies to all FOX Racing Shox rear shocks that utilize coil springs:

Reading Your Spring Rate


eng051

WHEREVER YOU RIDE. WHEREVER YOU RIDE.


Bushing Technology & Inspection | Seals & Foam Rings | Seal Cleaning | Control Direction | Oil Volumes | Structural Inspection | Dropout Thickness Inspection | Torque ValuesUnit Conversion | Suspension Tuning Tips | Using the Pump |  Important Safety Information | Service Intervals | Contact FOX Service | Warranty Information