


|

|

|
Installing Your Fork | Before You Ride | Setting Sag | Adjustments: RLC | Adjustments: RL | Adjustments: O/B RL | Service Intervals | Important Safety Information
|
|
travels |
|
||
|
model features, adjustments |
|
|||
|
lower leg |
15QR thru axle system, post style disc brake mounting | |||
|
spring |
air |
|||
|
riding styles |
XC, trail; AM |
The Dual Rate Control Valve (DRCV) deploys a dual air chamber system, in which a secondary air chamber opens at a specific point during shock travel. The DRCV system combines the efficiency of a smaller air volume ride with the plush response of a large air volume shock deeper into its travel stroke.
Be sure your fork is properly installed before proceeding. If your fork came pre-installed on your bicycle, continue to the next section.
Note: Do not use any solvents or de-greasers, as these products can cause serious damage to paint and anodized parts (upper tubes, knobs, steerers).
Do not spray water directly on the seal/upper tube junction. Do not use a high pressure washer on your fork.
To get the best performance from your fork, it is necessary to set and adjust sag. Generally, sag should be set to 15 – 25% of total fork travel.
Tip: Use your air spring PSI value in Suggested Air Spring SettingsPSI as a starting point only. Discovering your best sag value is a dynamic process that takes time to explore, given your riding style, bike geometry, total weight, and suspension feel preferences.
To set sag:
Note: The dual-chamber air valve looks very similar to a Schrader valve, but internally it's very different. This valve automatically equalizes air pressure between the main and secondary air chambers, as air is pumped into or released from this dual-chamber valve.
CAUTION: Do not attempt to service the dual-chamber air valve, or remove and reinstall its core! Doing this will risk irreparable damage to the valve, impairing its normal operation. Any damage caused to this valve is repairable only by an Authorized Fox Service Center.
Note: For proper sag adjustment, it is mandatory to thread the pump hose an additional 1¼ turns past the point where the pump initially shows a pressure reading.
Note: It is necessary to cycle the fork beyond 60% of its full travel at least once after the pump hose is removed, before attempting to measure sag.
Travel | XC/Race FIRM | All-Mountain PLUSH |
| 120 mm (4.70") | 18 mm (0.69") | 30 mm (1.19") |
| 140 mm (5.50") | 21 mm (0.81") | 35 mm (1.38") |
150 mm (5.90") | 23 mm (0.87") | 38 mm (1.50") |
Symptom | Remedy |
Too much sag | (+) air pressure in 5 psi increments |
Too little sag | (-) air pressure in 5 psi increments |
Excessive bottoming | (+) air pressure in 5 psi increments |
Harsh ride; full travel not utilized | (-) air pressure in 5 psi increments |
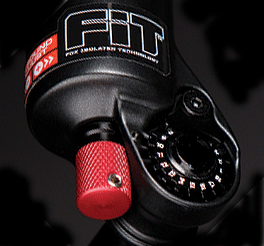
The rebound adjuster knob is located at the bottom of the right fork leg. This knob has 18 clicks of adjustment range.
Rebound controls the rate of speed at which the fork extends after compressing. Turning the knob clockwise slows down rebound; turning the knob counter-clockwise speeds up rebound. As a starting point, turn the rebound adjuster knob all the way clockwise (full in) until it stops, then turn counter-clockwise (out) 12 clicks.
|
Knob Setting |
Setting Description |
Tuning Tips |
Setup Tips |
|
|
Slow Rebound |
Too slow and your fork will pack down and ride harsh. |
If you increase your spring rate or air pressure, you will need to slow down your rebound |
|
12 (Factory setting) |
Average Rebound |
|
|
|
|
Fast Rebound |
Too fast and you will experience poor traction and wheel hop. |
If you decrease your spring rate or air pressure, you will need to speed up your rebound setting. |
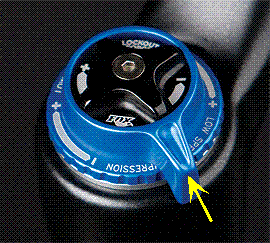
The blue compression lockout lever, located just below the black lockout force adjuster knob, allows you to close the compression damping circuit in the fork. This keeps the fork at the top of its travel, making it harder to compress.
Note: When you adjust the compression lockout lever, the black lockout force adjuster knob will also move. This is normal; the lockout force adjustment setting will not be affected.
Rotate the lever fully clockwise to lockout the fork. This position is useful in climbing and sprinting situations, but will sag with the rider’s weight. The fork will "blowoff" in the event that a big hit is encountered with the fork locked out.
To unlock the fork, simply rotate the lever fully counter-clockwise.
Note: The fork may cycle a couple of times after enabling lockout. Once complete lockout is achieved, the fork may continue to move 3 - 5 mm. This is normal and does not affect performance.
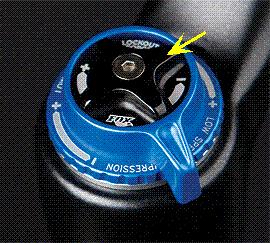
Even when your fork is fully locked out, there are instances when you still want your fork suspension to be active. To protect your fork's internal parts, your FOX fork will "blowoff" when it encounters an intense hit. You can adjust when the fork blows off—lockout force—by adjusting the black knob on the right-side top cap.
A convenient tuning feature of the lockout force knob is that it allows you to leave your fork in the locked out position—no more fiddling with fork controls when the trail requires your undivided attention. Although you might need to adjust the knob a few times to find the sweet spot, once it is found you can simply leave your fork locked out. Your fork will then respond to hits in the trail for example, but will be locked out when you are out of your saddle on a climb.
Turn the knob clockwise to increase lockout force and counter-clockwise to decrease lockout force.
Note: When you adjust the black lockout force adjuster knob, hold the blue compression lockout lever in place.
There are 10 clicks of adjustment. As a starting point, turn the knob all the way clockwise until it stops, then back off one click counter-clockwise.
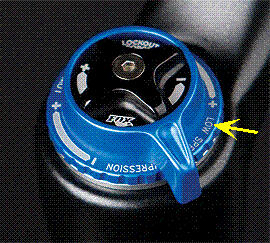
Low-speed compression damping is adjusted with the blue bezel ring that is positioned just below the blue lockout lever. This ring has 8 clicks of adjustment range. Compression damping controls the fork compression speed. Adjust the low-speed compression with lockout off (the lockout lever turned fully counter-clockwise). The factory setting is 8 clicks out counter-clockwise, from fully in clockwise.
|
Knob Setting |
Setting Description |
Tuning Tips |
Setup Tips |
|
|
Firm Compression |
Too firm and you will experience poor traction and wheel hop. |
Resists brake dive and keeps the fork up in the travel. Too firm and you may have poor traction in loose conditions. |
|
8 |
|
|
|
|
|
Soft Compression |
Too soft and your fork will pack down and ride harsh. |
Maximum wheel traction and bump compliance. Too soft and you may have excessive brake dive and a wallowy feel. |
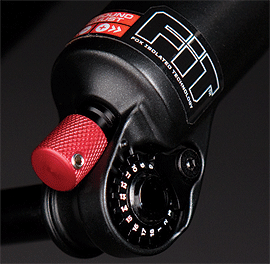
The rebound adjuster knob is located at the bottom of the right fork leg. This knob has 18 clicks of potential adjustment range.
Rebound controls the rate of speed at which the fork extends after compressing. Turning the knob clockwise slows down rebound; turning the knob counter-clockwise speeds up rebound. As a starting point, turn the rebound adjuster knob all the way clockwise (full in) until it stops, then turn counter-clockwise (out) 12 clicks.
|
Knob Setting |
Setting Description |
Tuning Tips |
Setup Tips |
|
|
Slow Rebound |
Too slow and your fork will pack down and ride harshly. |
If you increase your spring rate or air pressure, you will need to slow down your rebound |
|
12 (Factory setting) |
Average Rebound |
|
|
|
|
Fast Rebound |
Too fast and you will experience poor traction and wheel hop. |
If you decrease your spring rate or air pressure, you will need to speed up your rebound setting. |
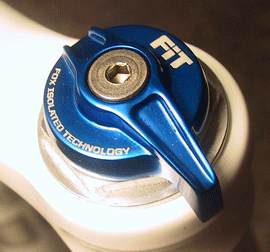
The blue compression lockout lever, located on the right-side top cap, allows you to close the compression damping circuit in the fork. This keeps the fork at the top of its travel, making it harder to compress.
Rotate the lever fully clockwise to lock out the fork. This position is useful in climbing and sprinting situations, but will sag with the rider’s weight. The fork will "blowoff" in the event that a big hit is encountered with the fork locked out.
To unlock the fork, simply rotate the lever fully counter-clockwise.
Note: The fork may cycle a couple of times after enabling lockout. Once complete lockout is achieved, the fork may continue to move 3 - 5 mm. This is normal and does not affect performance.
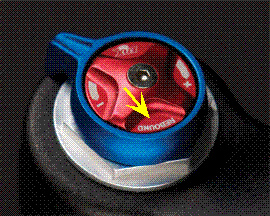
The red rebound knob is located on the top of the right fork leg, and has 12 clicks of adjustment. Rebound controls the speed at which the fork extends after compressing. Turning the knob clockwise slows down rebound; turning the knob counter-clockwise speeds up rebound. As a starting point, turn the rebound adjuster knob all the way clockwise (full in) until it stops, then turn counter-clockwise (out) 6 clicks.
|
Knob Setting |
Setting Description |
Tuning Tips |
Setup Tips |
|
|
Slow Rebound |
Too slow and your fork will pack down and ride harshly. |
If you increase your spring rate or air pressure, you will need to slow down your rebound |
|
6 (Factory setting) |
Average Rebound |
|
|
|
|
Fast Rebound |
Too fast and you will experience poor traction and wheel hop. |
If you decrease your spring rate or air pressure, you will need to speed up your rebound setting. |
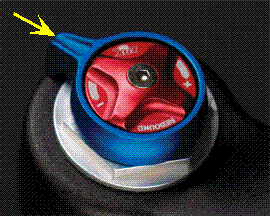
The blue compression lockout lever, located below the red rebound adjuster knob, allows you to close the compression damping circuit in the fork. This keeps the fork at the top of its travel, making it harder to compress.
Rotate the lever fully clockwise to lockout the fork. This position is useful in climbing and sprinting situations, but will sag with the rider’s weight. The fork will "blowoff" in the event that a big hit is encountered with the fork locked out.
To unlock the fork, simply rotate the lever fully counter-clockwise.
Note: The fork may cycle a couple of times after enabling lockout. Once complete lockout is achieved, the fork may continue to move 3 - 5 mm. This is normal and does not affect performance.

Bushing Technology & Inspection | | Oil Volumes | Dropout Thickness Inspection | Using the FOX HP Pump | Important Safety Information | Service Intervals | Contact FOX Service | FOXHelp Service Web Site