|
|
|
|
General Maintenance | Before You Ride | Sag Setup | Adjusting Rebound | Adjusting Travel | Remote Control Lever and Cable Installation | Maintenance Service Intervals | Important Safety Information
|
|
features |
Factory-tuned & fully independent rebound & compression damping controls for long and short travel modes, patented oil flow circuitry, travel adjust, rebound adjust, positive & negative air chamber adjust (spring curve configuration) |
|||||||||||||||||||||||||||||||||||||||||
|
spring |
air |
||||||||||||||||||||||||||||||||||||||||||
|
intended use |
XC, AM, Freeride |
||||||||||||||||||||||||||||||||||||||||||
|
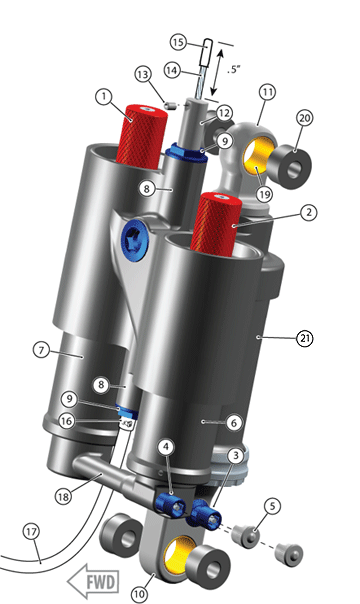
Parts Legend |
|
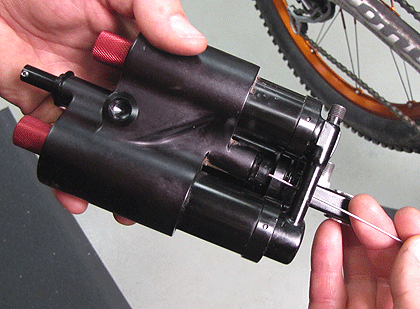
CAUTION: Internal servicing must only be performed by FOX Racing Shox or an Authorized Service Center.
WARNING: THE DYAD RT2 SHOCK IS NOT USER SERVICEABLE, OTHER THAN REMOTE CONTROL CABLE REPLACEMENT. NEVER ATTEMPT TO REMOVE THE SPOOL CHAMBER END CAPS FOR ANY REASON! ATTEMPTING TO PERFORM ANY INTERNAL SERVICE PROCEDURE ON THIS SHOCK CAN POTENTIALLY RESULT IN SERIOUS INJURY OR DEATH.
|

|
Note: To help improve the service life of the spool valve return spring, set the Dyad to long travel mode before storing your bike. Doing this will help overcome any friction buildup in the spool assembly as your bike sits unused.
To attain the best possible performance from your Dyad RT2 shock, it is necessary to first set sag. The recommended sag range is 33%-40% of total travel.
The Dyad RT2 Travel Adjust feature enables you to set sag deeper than any other FOX air shock, without sacrificing the pedaling platform necessary for best climbing efficiency.
WARNING: DO NOT SET POSITIVE AND NEGATIVE AIR PRESSURES OUTSIDE THE LOW AND HIGH AIR PRESSURE RANGE LIMITS ESTABLISHED FOR MAXIMUM PRODUCT SAFETY, AS SPECIFIED BELOW. SETTING AIR PRESSURES BELOW OR ABOVE THESE RANGE LIMITS CAN CAUSE SEVERE DAMAGE TO YOUR DYAD RT2 SHOCK, AND POTENTIALLY RESULT IN SERIOUS INJURY OR DEATH.
Note: If positive pressure is ever released prior to releasing negative pressure, this will cause the shaft to extend from the shock, but by itself will not cause any permanent damage. If this happens, do not cycle or ride the shock in this state. To restore the shock to its normal pressure state:
| Total Rider Weight | Air Spring Pressure Settings | Rebound Setting Positions
# clicks counter-clockwise (CCW) out from closed |
||||
| Positive Chamber | Negative Chamber | |||||
| lbs | kg | psi | bar | psi | bar | |
| 100 - 109 | 45 - 49 | 188 | 13.0 | 159 | 11.0 | 12 CCW out |
| 110 - 119 | 50 - 54 | 207 | 14.3 | 175 | 12.0 | 12 CCW out |
| 120 - 129 | 54 - 59 | 226 | 15.6 | 191 | 13.1 | 12 CCW out |
| 130 - 139 | 59 - 63 | 245 | 16.9 | 206 | 14.2 | 11 CCW out |
| 140 - 149 | 64 - 68 | 264 | 18.2 | 222 | 15.3 | 10 CCW out |
| 150 - 159 | 68 - 72 | 282 | 19.5 | 238 | 16.4 | 9 CCW out |
| 160 - 169 | 73 - 77 | 301 | 20.8 | 254 | 17.5 | 8 CCW out |
| 170 - 179 | 77 - 81 | 320 | 22.1 | 270 | 18.6 | 7 CCW out |
| 180 - 189 | 82 - 86 | 339 | 23.4 | 286 | 19.7 | 6 CCW out |
| 190 - 199 | 86 - 90 | 358 | 24.7 | 302 | 20.8 | 5 CCW out |
| 200 - 209 | 91 - 95 | 376 | 26.0 | 318 | 21.9 | 4 CCW out |
| 210 - 219 | 95 - 99 | 395 | 27.3 | 334 | 23.0 | 3 CCW out |
| 220 - 229 | 100 - 104 | 414 | 28.6 | 349 | 24.1 | 2 CCW out |
| 230 - 239 | 104 - 108 | 433 | 29.8 | 365 | 25.2 | 1 CCW out |
| 240 - 249 | 109 - 113 | 450 | 31.1 | 381 | 26.3 | 0 CCW out (100% clockwise closed) |
Note: It is crucial to follow the setup procedure steps exactly in sequence as presented below. A failure to do this can result in poor performance of the Dyad RT2 shock.
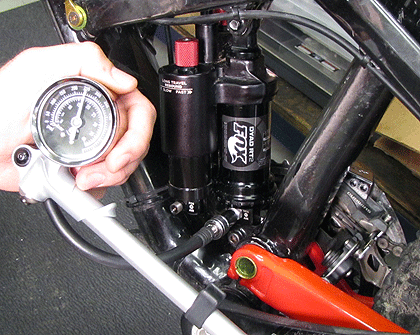
WARNING: NEVER USE ANY HIGH PRESSURE HAND PUMP WITH A MAXIMUM TOTAL PRESSURE RATING OF LESS THAN 450 PSI (31.03 BAR) TO SET AIR PRESSURE IN THE POSITIVE AND NEGATIVE AIR CHAMBERS. DOING SO RISKS CAUSING PERMANENT DAMAGE TO THE PUMP BESIDES GETTING AN IMPROPER PRESSURE SETTING, WHICH CAN CONTRIBUTE TO A LOSS OF RIDER CONTROL RESULTING IN SERIOUS INJURY OR DEATH.
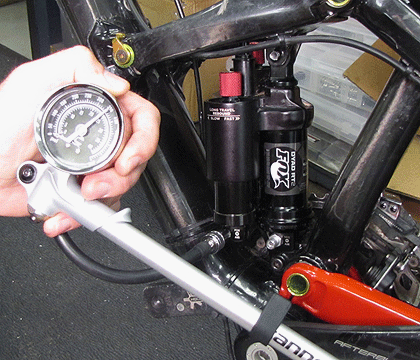
WARNING: NEVER USE A FLOOR PUMP TO SET AIR PRESSURE IN THE POSITIVE AND NEGATIVE AIR CHAMBERS. DOING SO RISKS CAUSING PERMANENT DAMAGE TO THE FLOOR PUMP BESIDES SETTING IMPROPER AIR PRESSURES, WHICH CAN CONTRIBUTE TO A LOSS OF RIDER CONTROL RESULTING IN SERIOUS INJURY OR DEATH.
 |  |
 |  |
CAUTION: Do not ride or cycle the suspension with shock pressures outside the established pressure range (positive 100-450, negative 0-400), as these actions may cause damage either to the shock or you, or both.
If for any reason your shock pressure settings are outside the normal range, do the following to restore the shock to its normal pressure state:
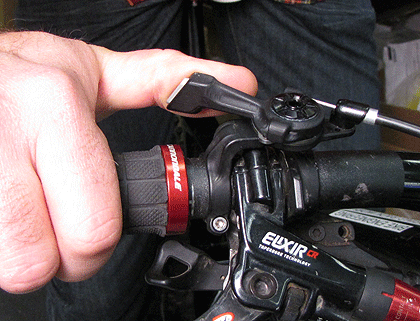
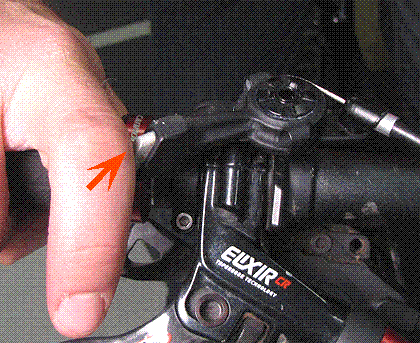
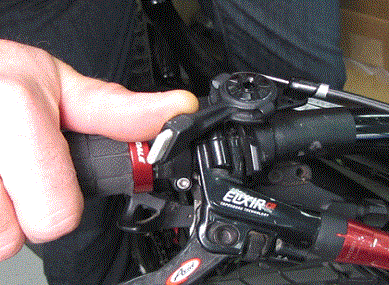
WARNING: DO NOT PLACE YOUR FINGERS WITHIN A MOVING LINKAGE. ATTEMPTING TO ADJUST REBOUND ON YOUR DYAD RT2 WHILE SITTING OR RIDING IN MOTION ON YOUR BICYCLE CAN LEAD TO A SERIOUS HAND INJURY OR A LOSS OF RIDER CONTROL, WHICH CAN RESULT IN SERIOUS INJURY OR DEATH.
With the Dyad shock, rebound controls the rate at which your rear wheel returns after it has been compressed. The proper rebound settings for long (flow), short (elevate), or both travel modes are of personal preference, varying with rider weight, riding style and terrain. A basic rule of thumb is to set rebound to be as quick as possible, without kicking back and pushing you off the saddle.
Tip: Start with your suggested rebound setting values in the Air Spring Pressure & Rebound Settings table. Spend some time experimenting with various long and short travel rebound setting combinations, to develop a better familiarity with your Dyad RT2 shock.
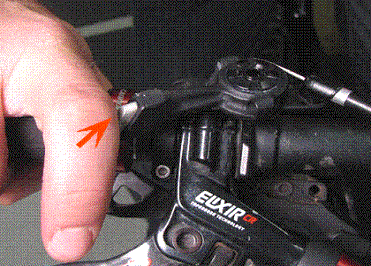
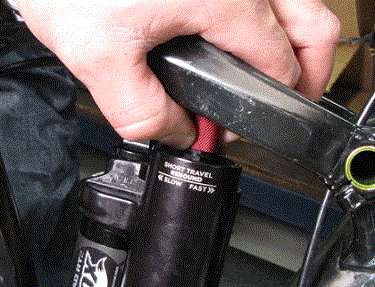
For slower rebound, adjust the red knob clockwise, long or short travel.
For faster rebound, adjust the red knob counter-clockwise, long or short travel.
Note: Always be certain that your remote actuation lever is set to the travel mode for which you are adjusting rebound.
If you want more or less sag, choose the next lighter or heavier rider weight range in the Air Spring Pressure & Rebound Settings table. Repeat steps 1 through 7 of the Dyad RT2 Sag Setup procedure with the new air pressure settings.
|
|
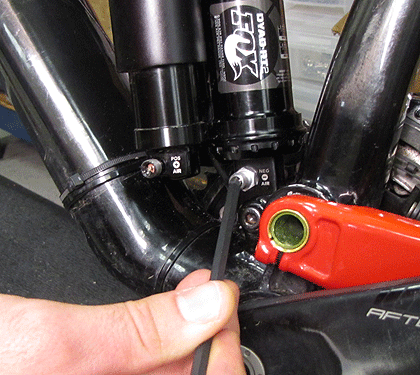
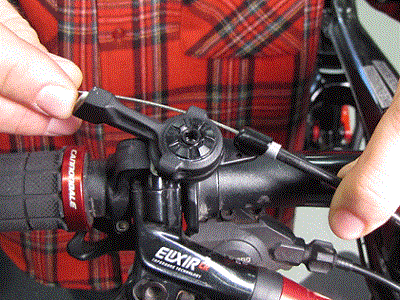
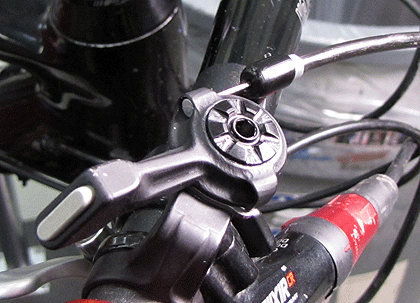
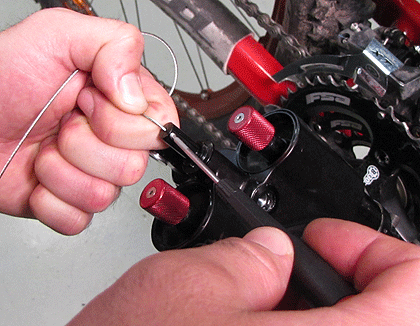
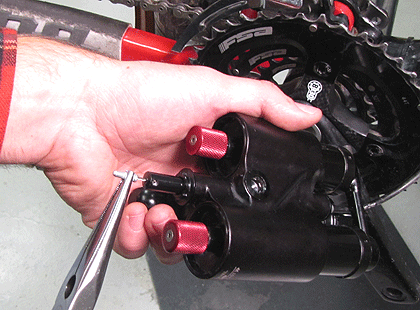
Note: If you're having trouble feeding the cable through the spool chamber and past the anchor set screw, make sure that you have a new or cleanly snipped cable, or the anchor set screw is backed out far enough.
WARNING: NEVER ATTEMPT TO REMOVE THE SPOOL CHAMBER END CAPS FOR ANY REASON! UPWARDS TO 450 PSI (31 BAR) CAN PROPEL AN END CAP WITH EXTREME FORCE AND VELOCITY, POTENTIALLY RESULTING IN SERIOUS INJURY OR DEATH.
![]()
Bushing Technology & Inspection | | Oil Volumes | Dropout Thickness Inspection | Using the FOX HP Pump | Important Safety Information | Service Intervals | Contact FOX Service | FOXHelp Service Web Site